Some time ago I posted a thread about a bag concept I slowly developed based on some experiences, research, and conceptualizing on how to perform onsite penetration testing of facilities. In the not too distant past I created and operated a team of people to perform this testing on behalf of clients in order to verify or improve their security controls. This bag is maintained mostly out of a desire to still have those tools available. I might need to gain entry to property when am locked out or maybe someone has illegally restricted me from access to a place I own, manage, or have legitimate claim to enter. The article featured here has been written for those or other legitimate and/or contracted purposes. Any unauthorized, illegal, or inappropriate use of these tools or methods are the sole responsibility and actions of the reader.
LEGAL DISCLAIMER
***** This post and any information within is intended for entertainment purposes. Use of items pictured, described, and intimated can be considered illegal in some jurisdictions and situations. Tactics recounted, explained, or imagined should only be practiced on property you own, have been granted legal easement, or are contractually and legally allowed to enter. The author and this website wish that any readers understand this disclaimer thoroughly. Any creators and content providers associated with this and other DigitalDropzone projects take on no legal liability, loss of indemnity, or responsibility for anyone misusing the information provided. *****

The Bag
Transporting items of this entertaining quality can present some legal issues and if done improperly can attract unwanted attention. Not everyone understands that your possession of these items is intended for appropriate and private uses. In the off chance someone sees you carrying these items from one legal location to another, we want them to leave you in peace.
To accomplish this you should place everything in a nondescript bag that looks common for normal, everyday use. Avoid bright or dark colors so as to be unmemorable and innocent respectively. Military styles and camouflage patterns should also be avoided as they tend to imply a certain personality type that we might wish to avoid presenting.
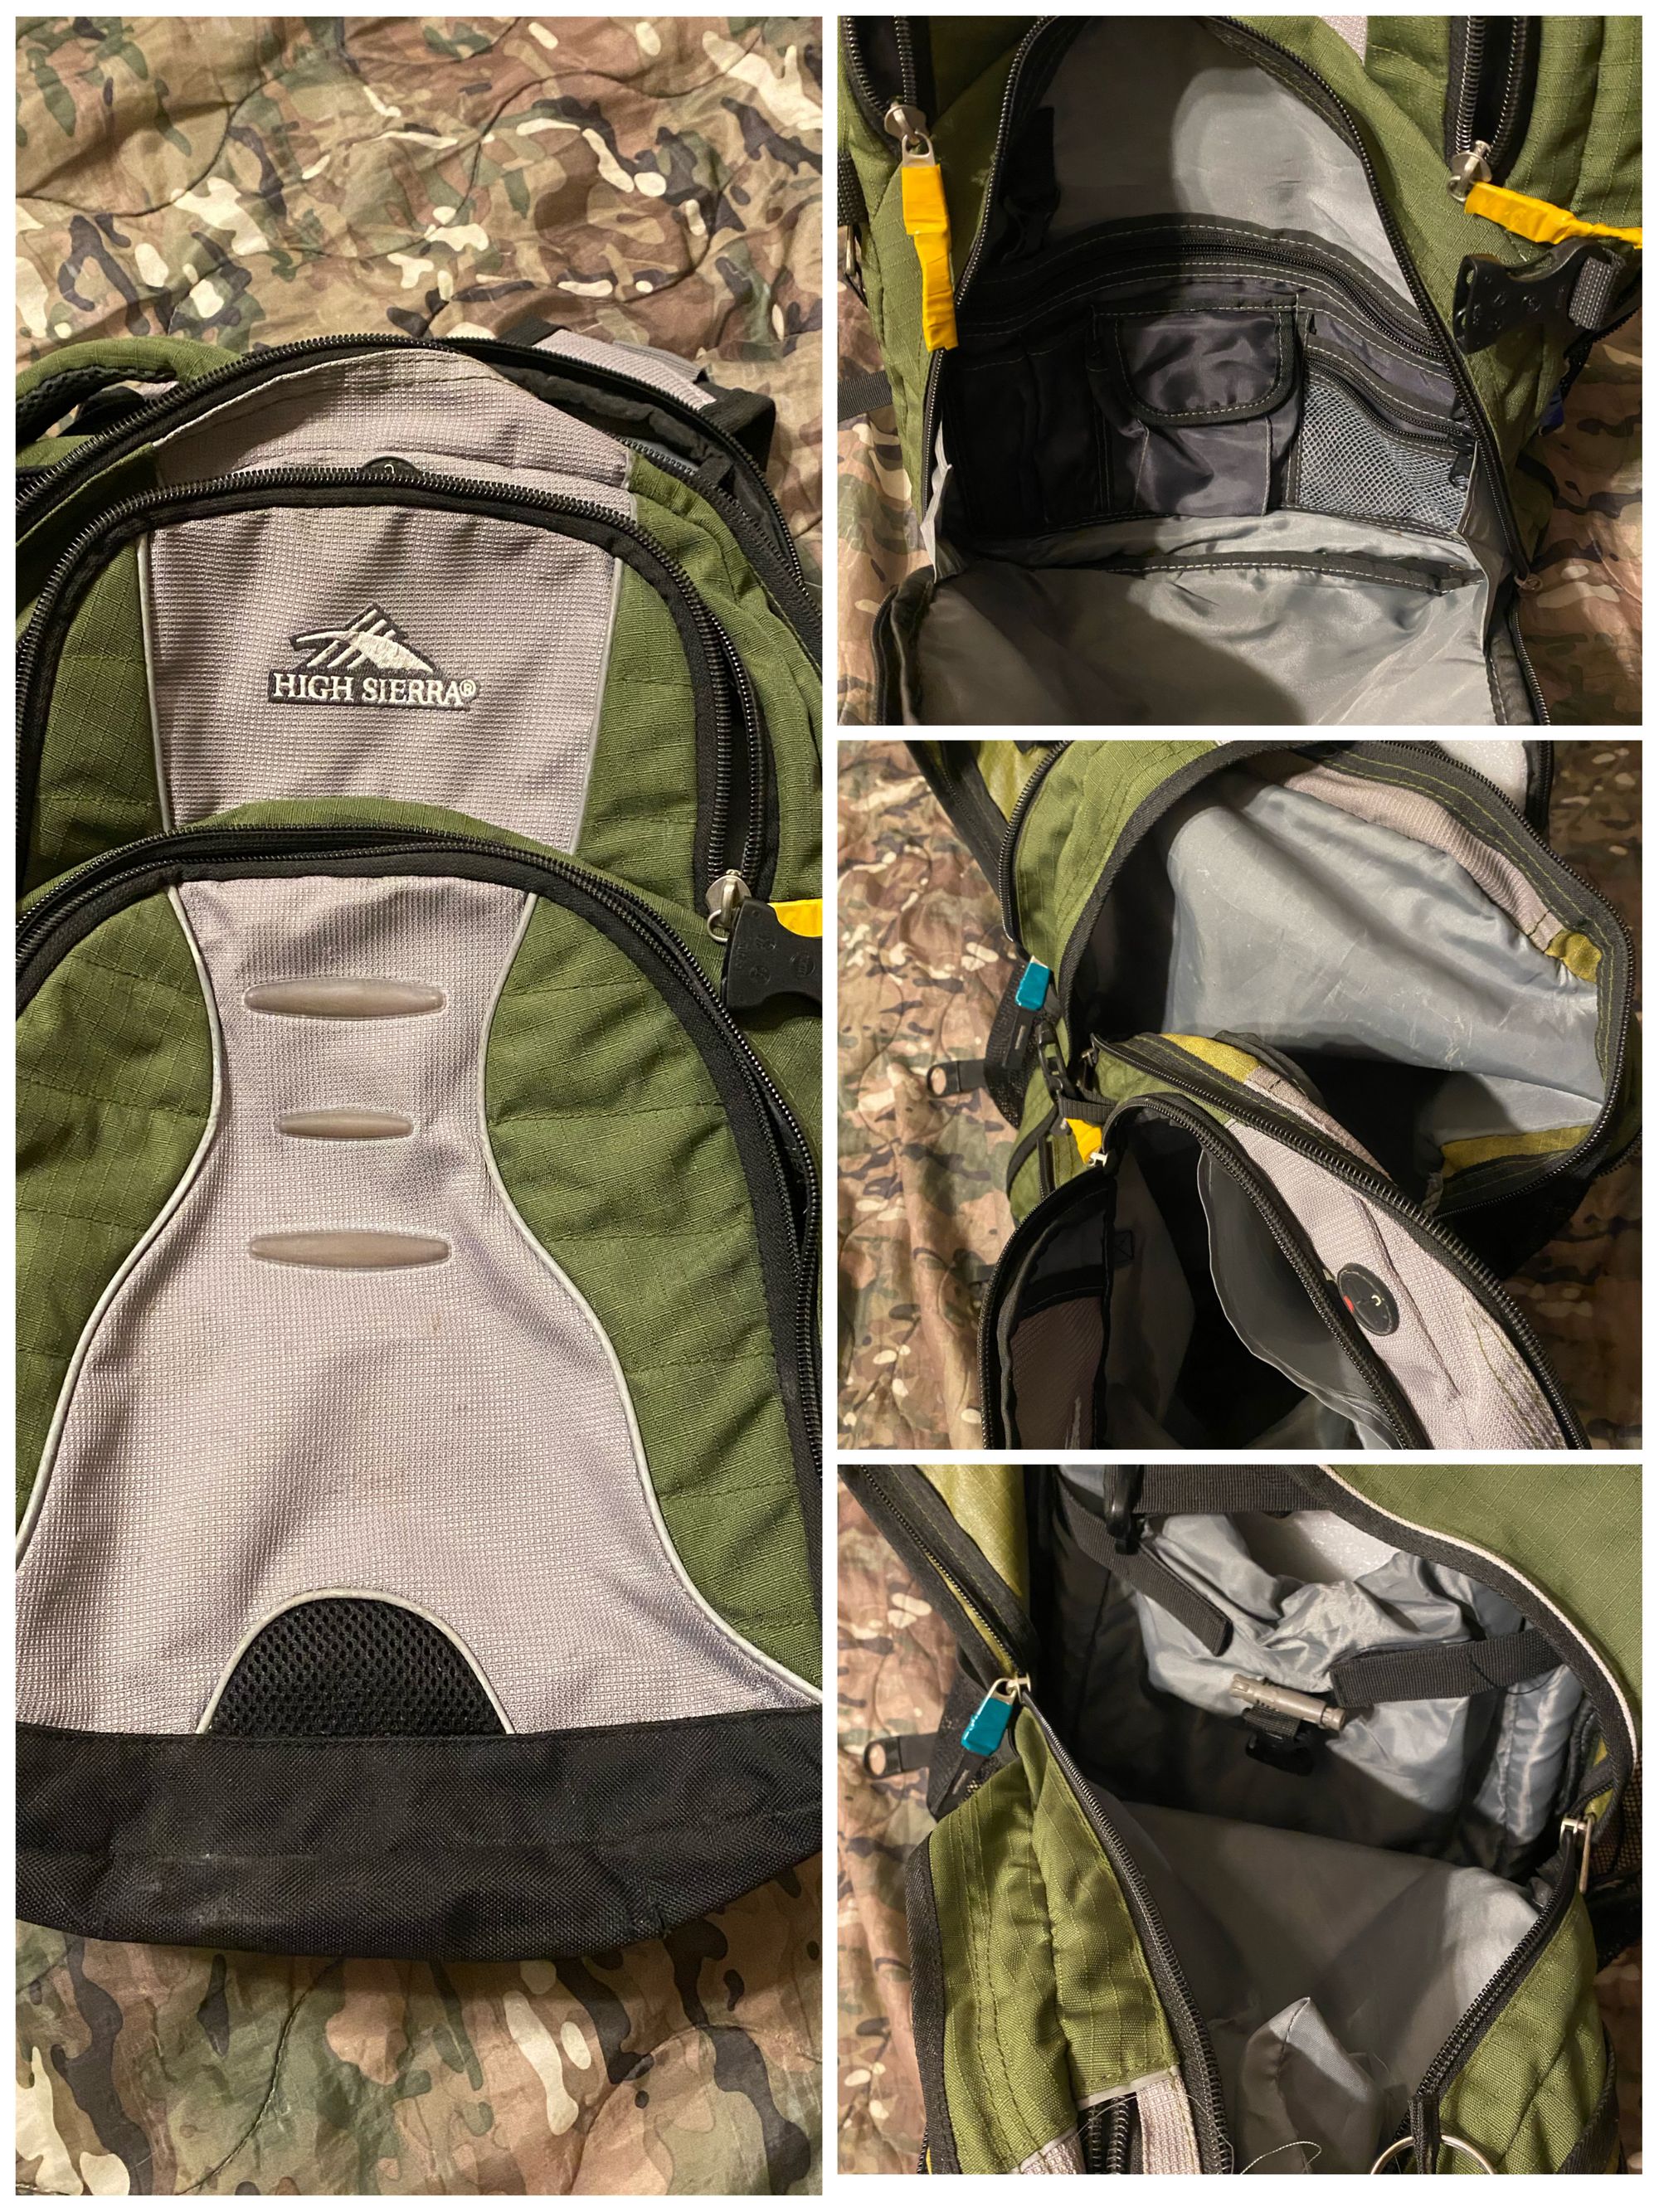
This bag is basically a straight off the shelf purchase with only some slight modifications. There are many divided sections which have been used to partition the various hypothetical and imagined tasks this bag intends to solve. The major compartments and associated items are as follows:
- Large equipment (bolt cutters, cheater bars, pry bar, rope)
- Medium sized door breaching equipment (ascenders with aiders, harness, climbing tools, gloves, "Rap Wrap," grappling hook, under the door tool, breach pens)
- Slim medium sized compartment (inflatable wedge, door stop, hacksaw, spare hacksaw blades)
- Small item compartment (miscellaneous tools, alarmed door stops)
Like most bags equipped for a purpose, items often used should be accessible and items used together should be stored together. Experience should dictate what goes where and what experience hasn't yet filled in common sense should be interrogated. Another consideration is that some of these imagined activities might be performed in low light conditions or practiced in silence. In low light conditions like those experienced at night you should ensure that items can be found easily. To keep things quiet items should be wrapped in tape, plastic, cloth, or kept separate to prevent them from jangling or making noise when clanging against each other in the bag when carried. Pay attention to how items have been modified, prepared, and stored when reviewing pictures or reading descriptions. Some of these modifications won't be described but should hint or imply intent.
Large Equipment
This largest compartment is setup to store the least often used and bulkiest items such as bolt cutters, grappling hook, and rope. It is very rare to use these items and they are only carried for exigencies that are not typical for the normal uses imagined for this kit.
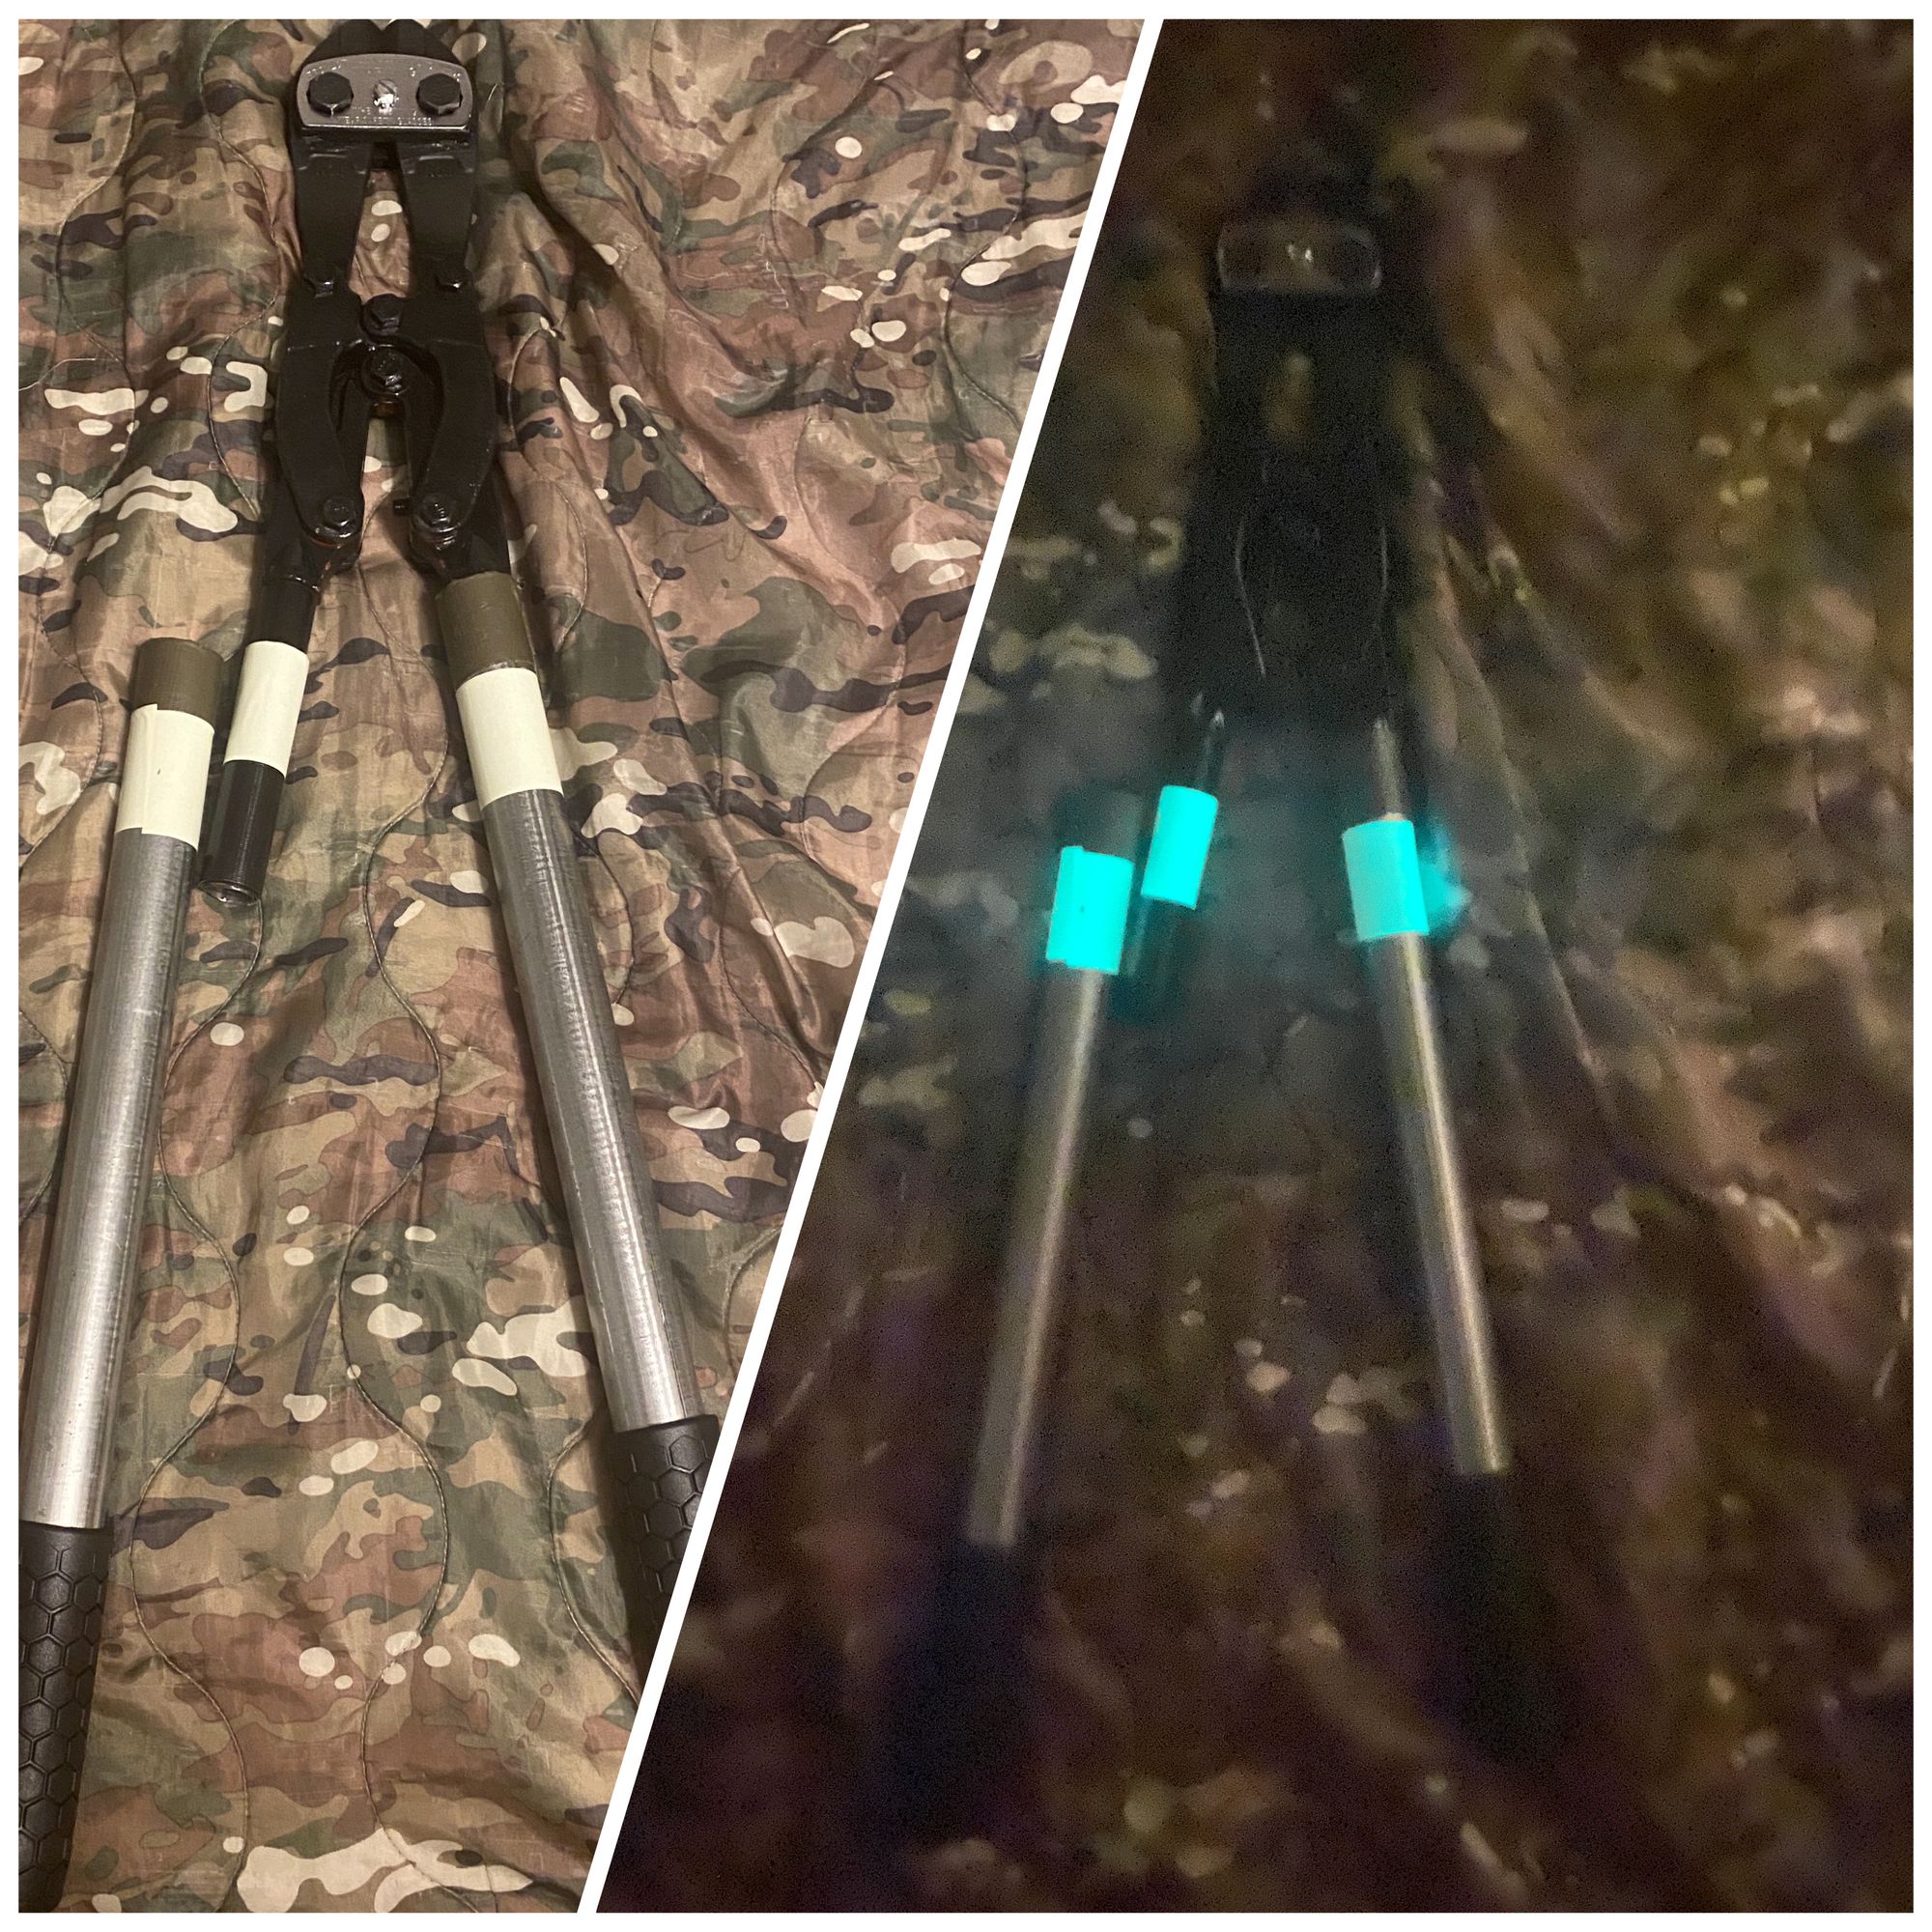
The bolt cutters were fairly heavily modified with the main goal of shortening the length. This first alteration made was to remove the standard length handles but still allow for the leverage needed to function. I shortened them a great deal, but short handles make them hard to cut with, so new handles were constructed with antenna mast. Antenna mast is strong enough for most use as long as the normal handles are not cut too short. You want the leverage of these "cheater bars" to have a large surface area contact with the remainder of what was not removed so that the masting does bend when used. Bicycle handlebar grips were added for comfort. The next modification is putting tape around the edges inside and outside the ends of the "cheater bars." This quiets them when they might bump into other items in the bag when carried and when used for their purpose. Luminescent tape was added to both the ends of the bolt cutters as well as the cheater bars so that they could be found and paired together in the dark, when light isn't available, or a good idea to use.
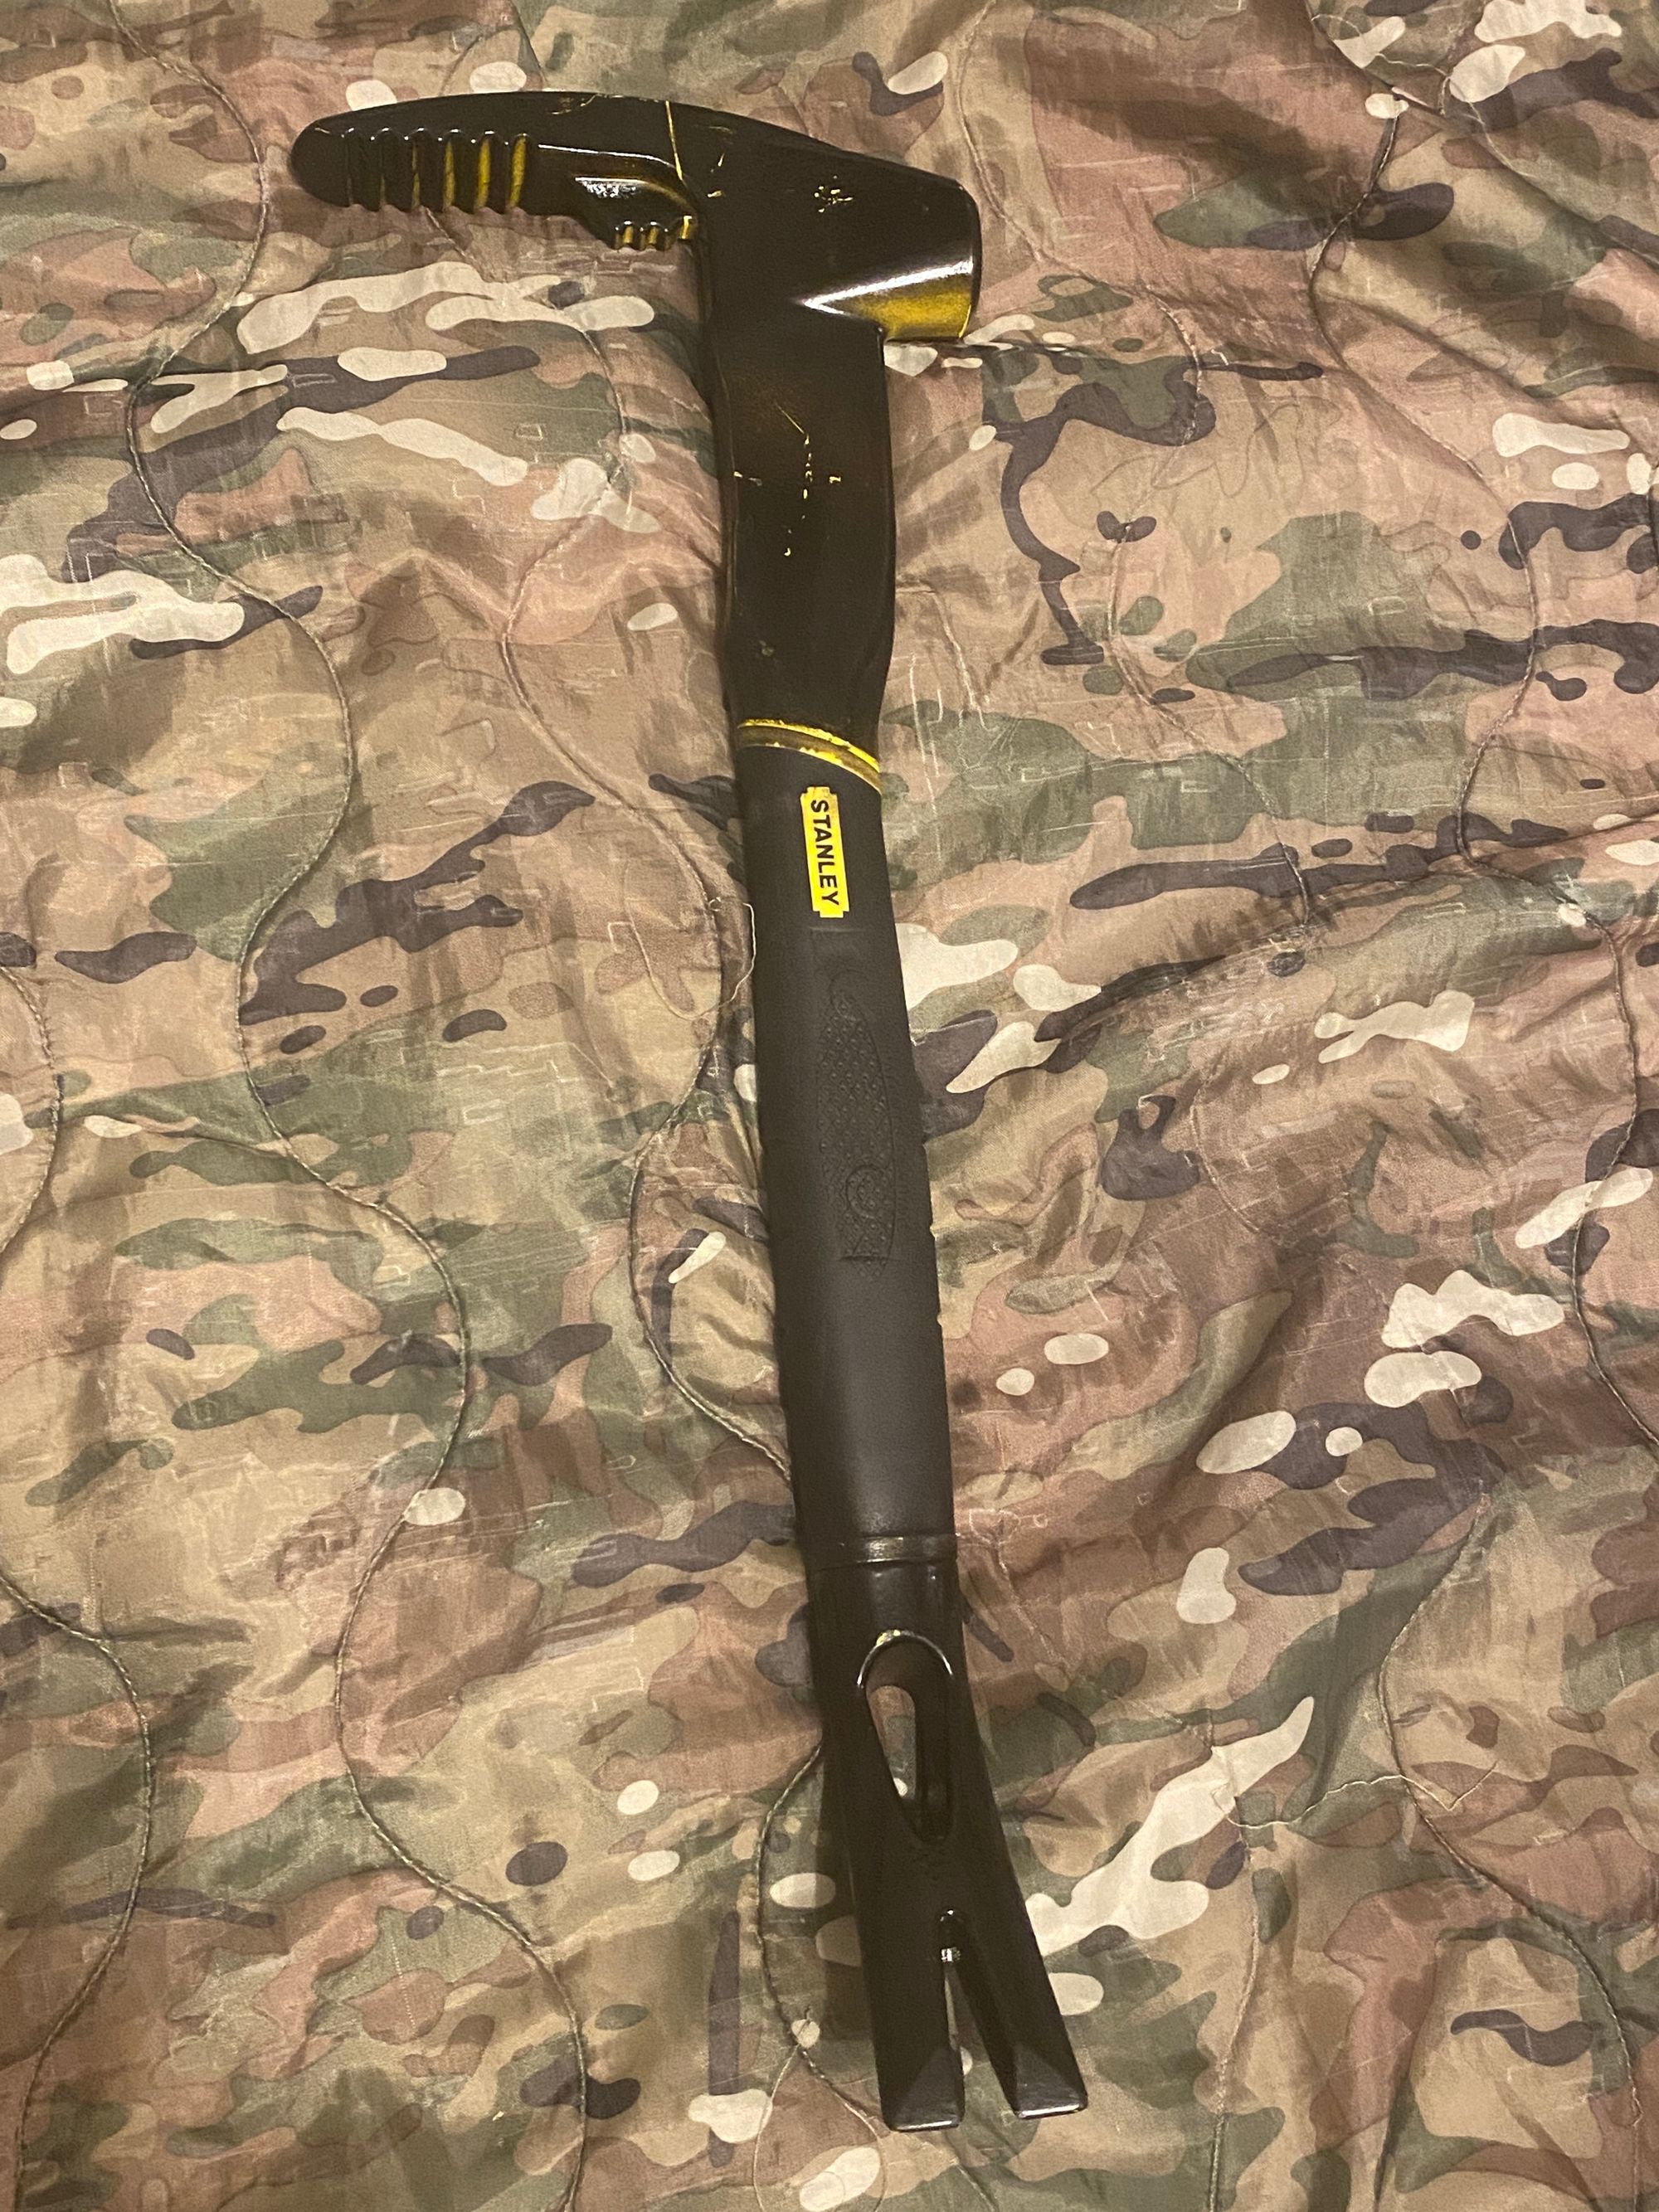
A modified Stanley Fat Max Fubar was added to the bag in the recent update. It was bought and part of the board bending portion was cut off. This cut was then polished and sanded down. To avoid the bright coloring a little bit of black paint was applied.
This next item appears very LARPy and must be admitted, never used practically. There are many issues this item might cause and foremost of them would be the noise of their use. Throwing a heavy steel object can produce a lot of racket, if successfully tossed, but especially if you miss and must keep performing the throw. Outside of this consideration they could be used for many purposes, the main being the use commonly seen in television. If purchasing these ensure that you get the heavier steel hooks and not the common and cheaper aluminum ones. The utility of them folding down and flattening make them much easier to store.
The rope is an important item and can be used to ascend using the grappling hook but can also be used to abseil from heights. It may seem strange but I have found that many targets are vulnerable at higher floors or from the rooftop. People simply don't expect anyone to go through a window or drop into a courtyard. The three knots used are important to the rope setup and the concerns one might have deploying it quickly and without entanglements. The monkey fist knot is used to keep the end of the rope secured to the bag as will be shown later, and to ensure that if you are abseiling- you don't reach the "bitter end." It would be better to end up suspended from the end of a rope than fall from the last part of the rope to possible injury or even death.
The length of the rope has been shortened using a daisy chain knot. This knot unlike typical ones is designed to come untied when pulled. This particular setup is only secured with some lightweight tape to prevent it from coming untied under normal handling, but insecure enough to come undone when pulled with more force. When the free running end is pulled the rope will continue to lengthen until it reaches the ground or all the length is fed out.
The final knot used is the one intended to secure the grappling hook or other items on the free running end. A bowline is one of the simplest and best knots to learn. This knot allows for a loop that will not close on anything put within it. The knot featured and used for this rope has also been made more secure with another half hitch.
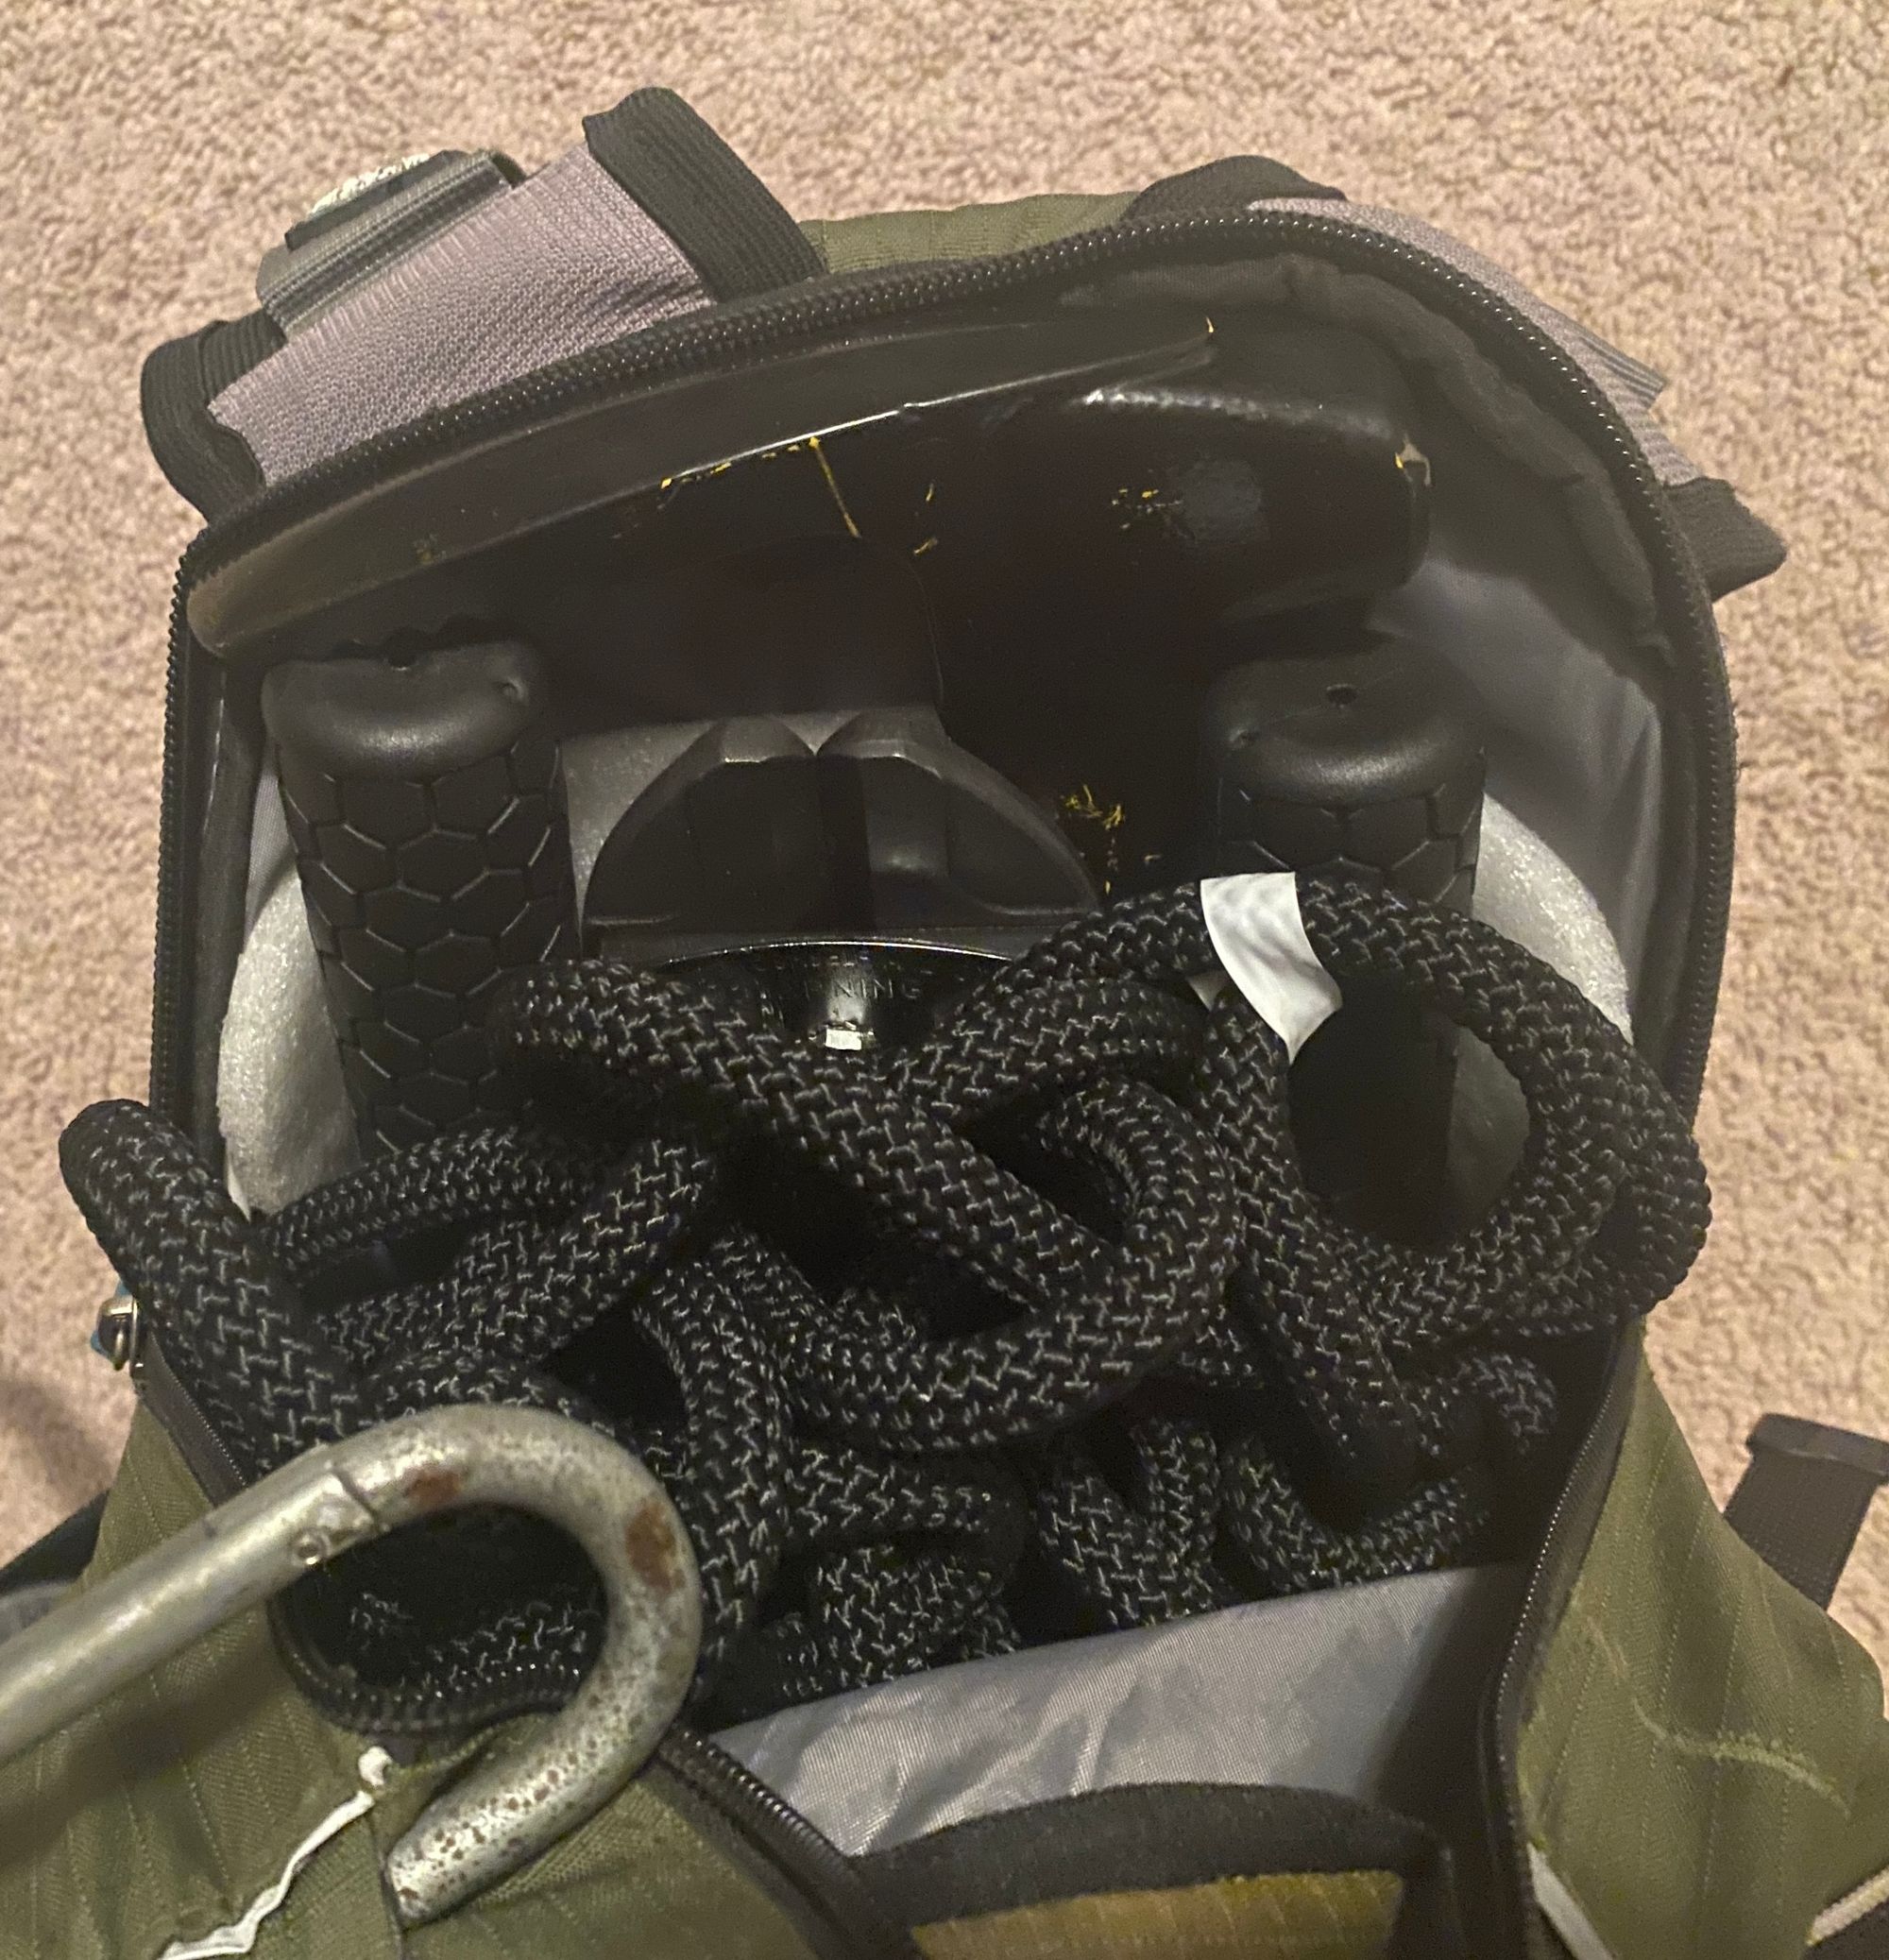
Since the hook and bolt cutters are to be rarely used they were placed inside first. The rope was added next but it should be noted that it was attached to the bag as well. This particular setup allows a few things. First there are two zippers for this compartment. One that opens along the nearest edge to the back straps, and another seen here. This allows for the user to grab the tools through the former when needed or the latter and pictured zipper to be used to retrieve the whole rope at once. The attachment to the bag has an intent though. Say you wish to attach the rope to either the hook or another apparatus and are in a hurry. You can do this and use the weight of the bag to deploy the rope. If you have tied your daisy chain correctly and packed the rope the right way, it should feed out as the bag falls, using this weight to draw the rope out. This should be tested to ensure you know how to pack it correctly and be able to reach your tools without making noise or digging for them too much.
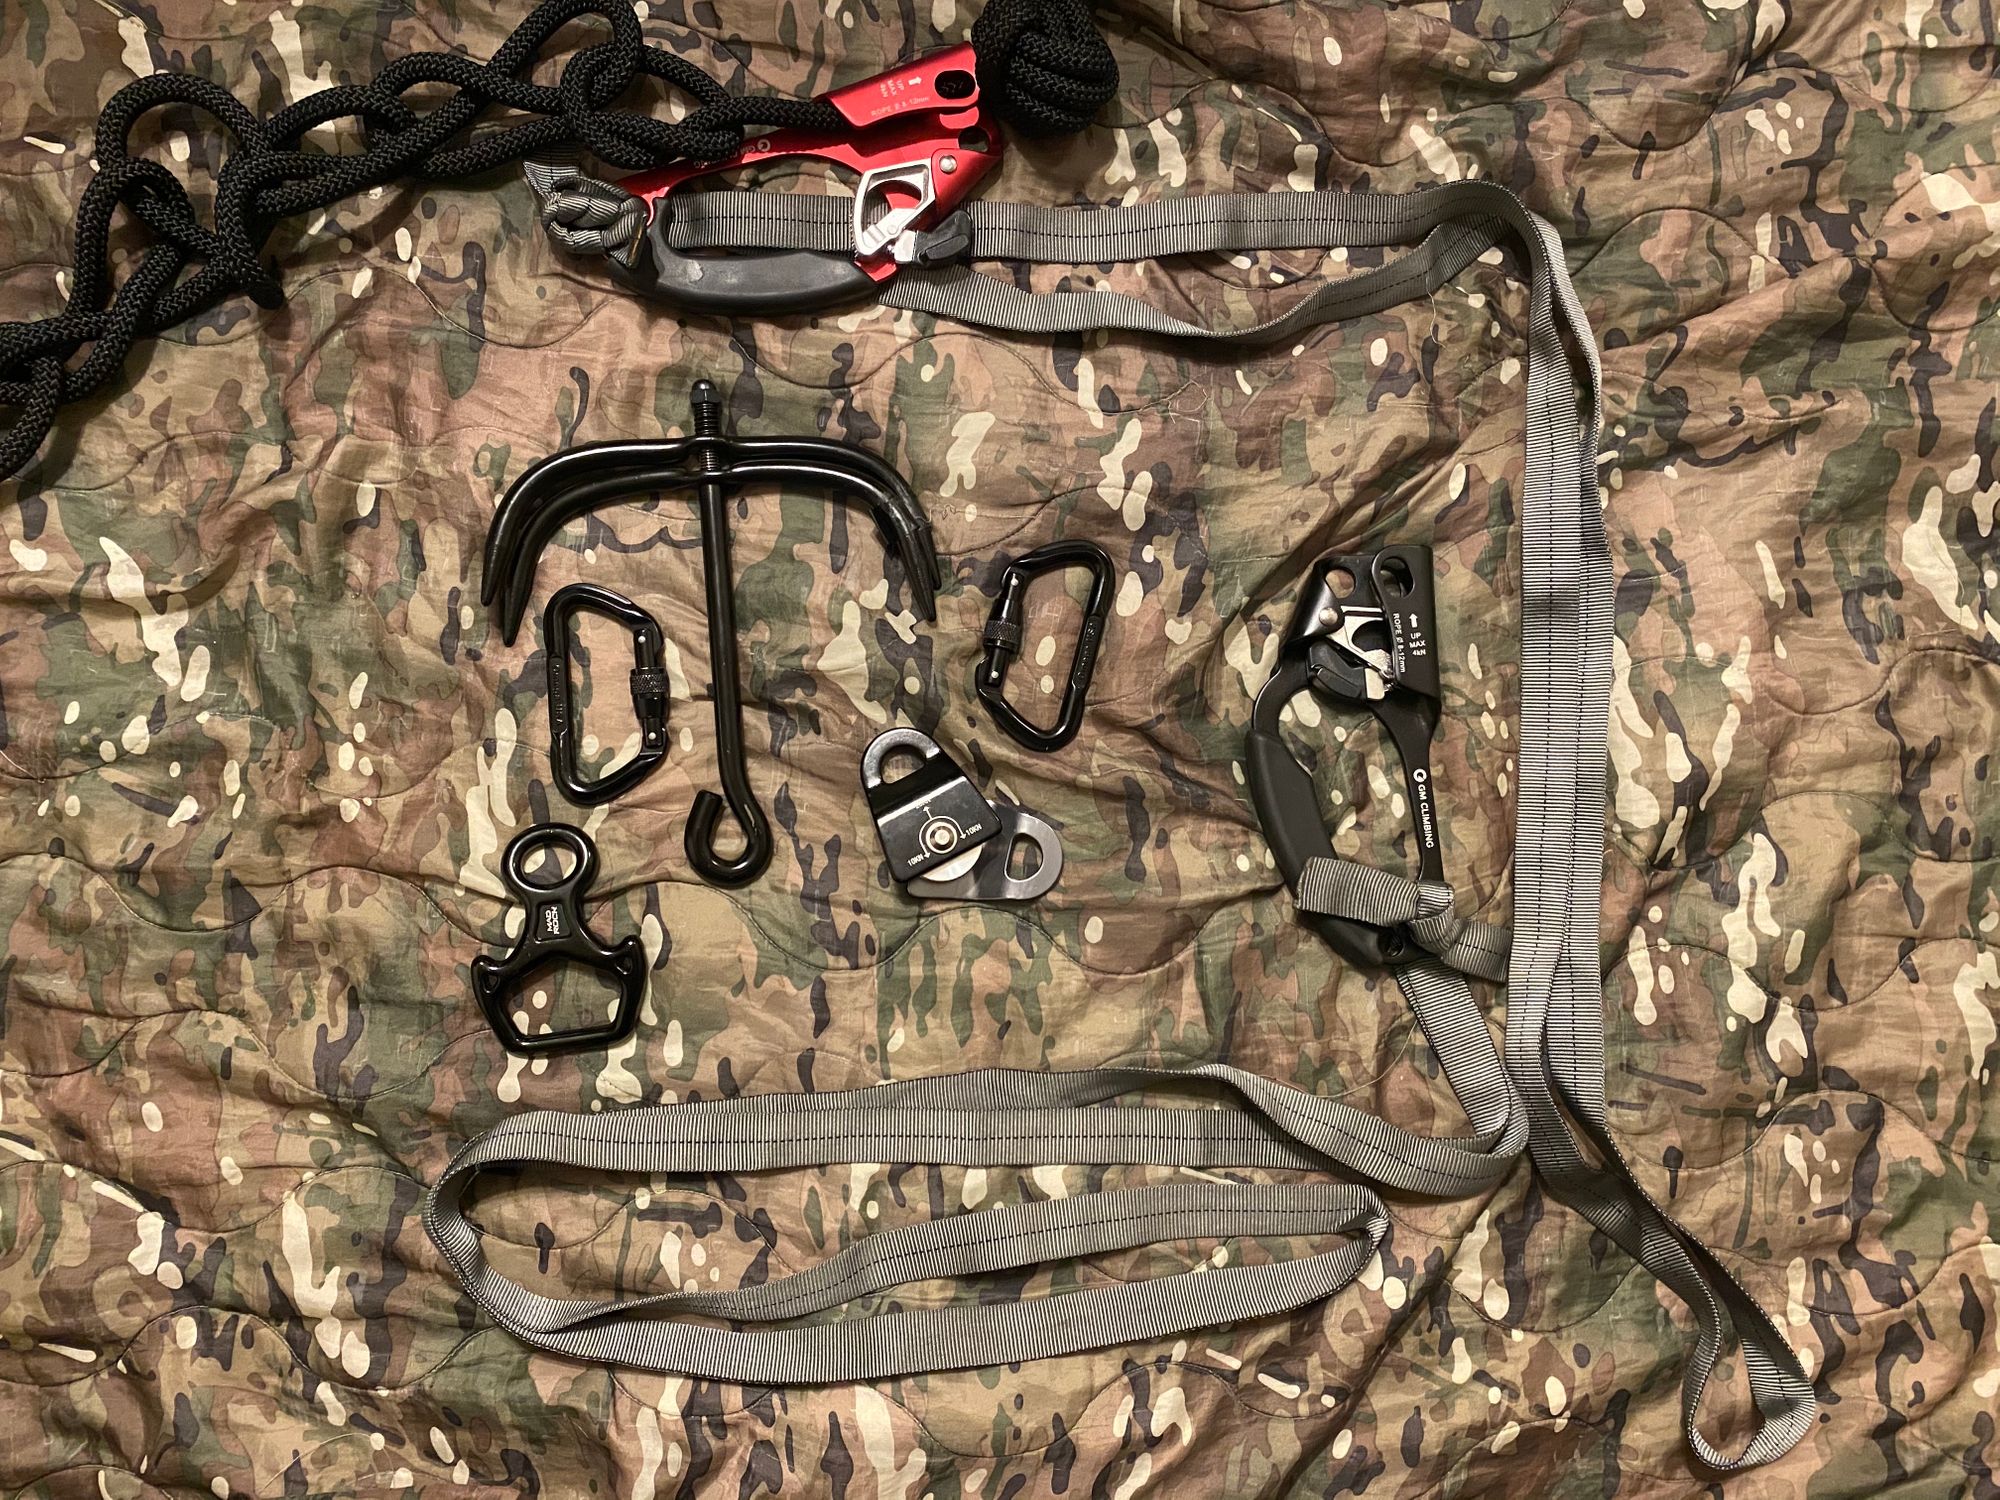
The rope and maybe the hook are just the basic method for climbing or descending verticals. The real work for each are performed by the tools pictured above. It should be noted that climbing and descending rope is a very dangerous and technical skill to practice and especially perform under stress. Anything read online about the techniques to do either, including this post, should be taken with grains of salt. Practicing any technique is best under the guidance and supervision of a professional, and always from safe heights with proper safety equipment and measures undertaken.
Ignoring the hook pictured above, the tools featured will be named and their use described clockwise from the top. The red and black tools top and right are ascenders. Ascenders use a toothed cam to grab the rope with great friction when weighted. A climber can place his a foot in the strap pictured (called an aider) and using a rhythmic motion stand in one and progress the other along the rope. I find this to be a rather unsettling experience and suggest folks wear a harness (discussed later) and clip in the aiders to ensure that if they experience a fall or slip in their grip the harness can potentially capture a fall.
Moving around the outside edge the descender or rappelling device is featured. There are many designs but the basic shape is a figure eight sometimes with "ears" to prevent entanglement or knotting on the device. I am not a professional climber and won't make any recommendations. Consult the guidance and training from an experienced professional before and after purchase for proper use and shape for your descending techniques. The purpose of this device is to create friction for the rope as it encircles the device allowing a user to apply or subtract tension on the rope to control the descent. This technique is extremely dangerous and should be practiced as mentioned before, with additional caution.
Moving toward the inside are two carabiners. These are to be used to attach rope, rigs, equipment, and other items to the rope or harness. Their use should be self explanatory and you should have at minimum, two. The last device pictured is a simple pulley. Horizontal rope traverses are made smother and safer with this device in my experience, but it isn't a required item. The intent for this is to be able to capture the rope to a location and cross over some place you can't easily walk or move across. Usually this would be from one building to another or across a terrain feature such as a gap or creek. The pulley could also be used to raise or drop equipment smoothly.
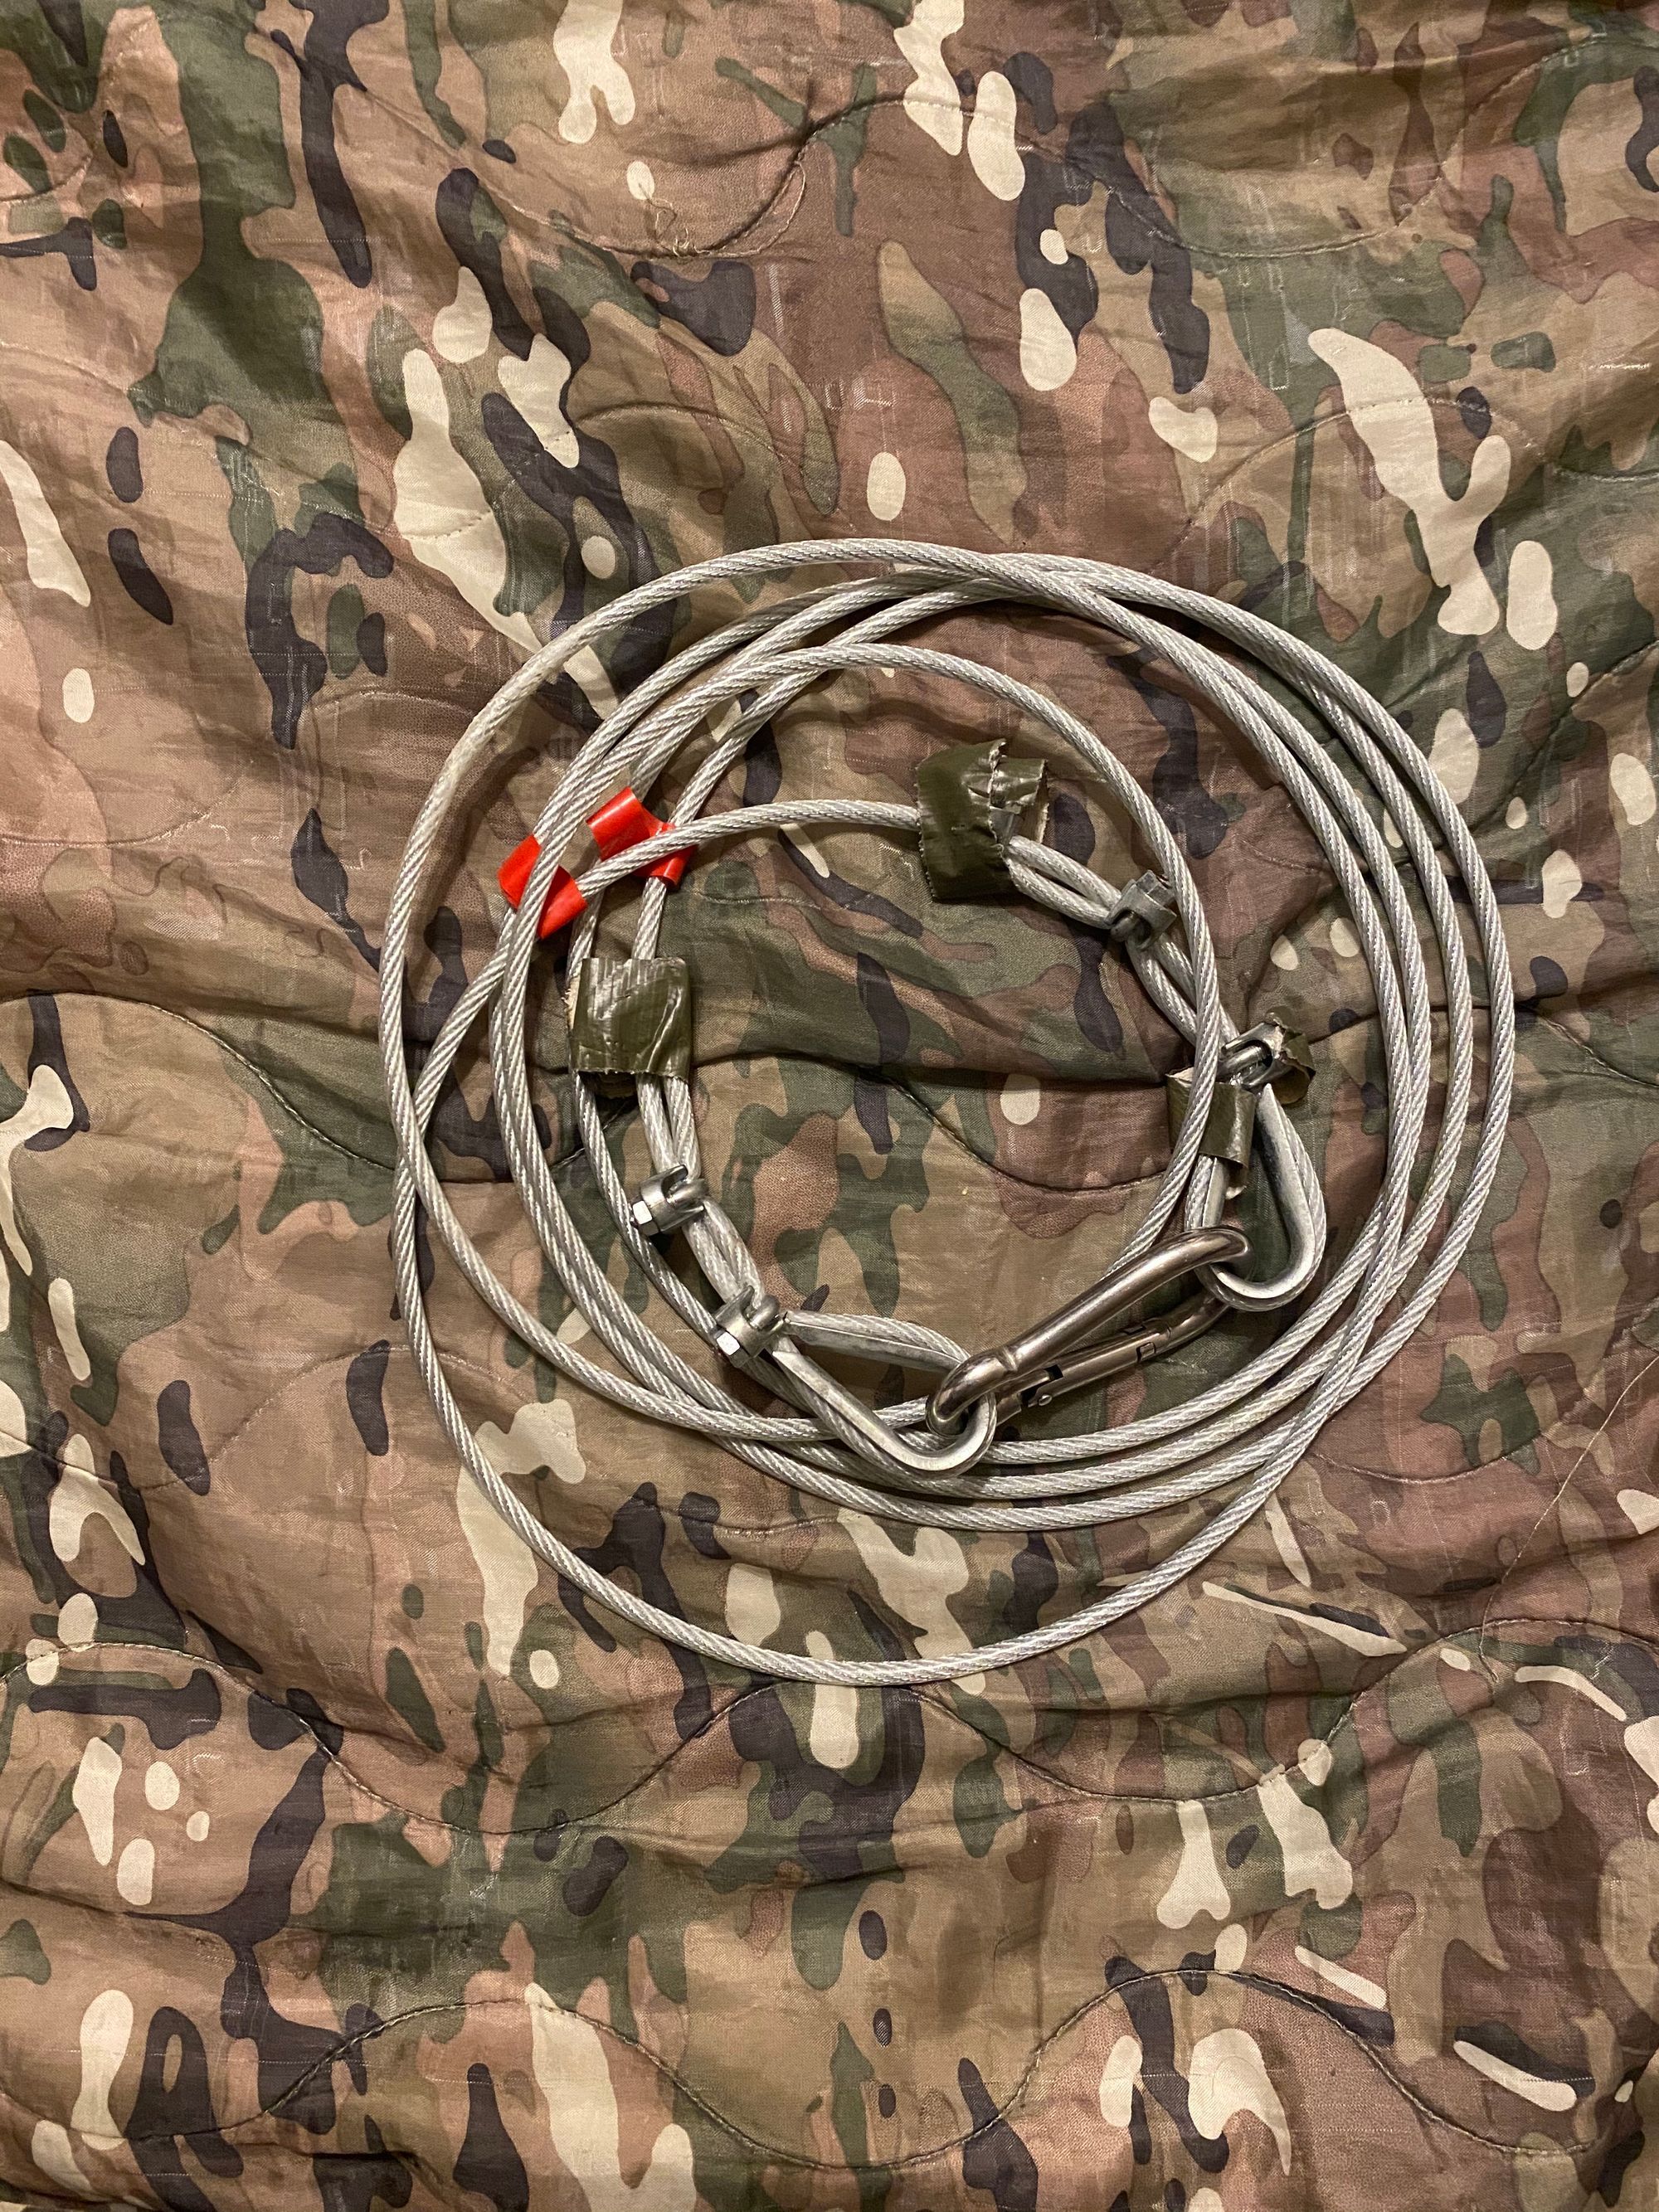
The solution pictured above is homemade, but I have heard and seen similar solutions. The main purpose is to be able to retrieve your rope after a descent or prevent friction from abrading the rope and limiting its lifespan. This is a sacrificial item and should be wrapped around a solid object, One free running end of the rope should be clipped into the carabiner that connects the "Raw Wrap" ends together, or a spare carabiner can be used if it can be left behind. This rope should be heavily knotted on one side of this carabiner and the user should descend using the other side. The idea is that the doubled rope is secured from running through the carabiner while the user descends, but upon arrival they can untie the knot and pull the rope through and free. Again this item will be left behind so that if you intend to leave it try to do so in an inconspicuous place or without any suspicious links back to yourself.

This harness is not the best or worst available, but it was extremely affordable and has served well over many years. It can be replaced with a Swiss Seat if a person is comfortable with that option, and can also be substituted by a more expensive and safer setup. A climbing professional's advice should be sought and followed for better advice when considering this extremely important item. Gloves are an absolute must when using these devices and especially for abseiling. The friction from a rope can quickly burn someone and possibly cause a user to release grip at a terrible time which could result in death. I prefer a harness setup like this for the options it affords me to carry climbing devices and for the ability to don it quickly.
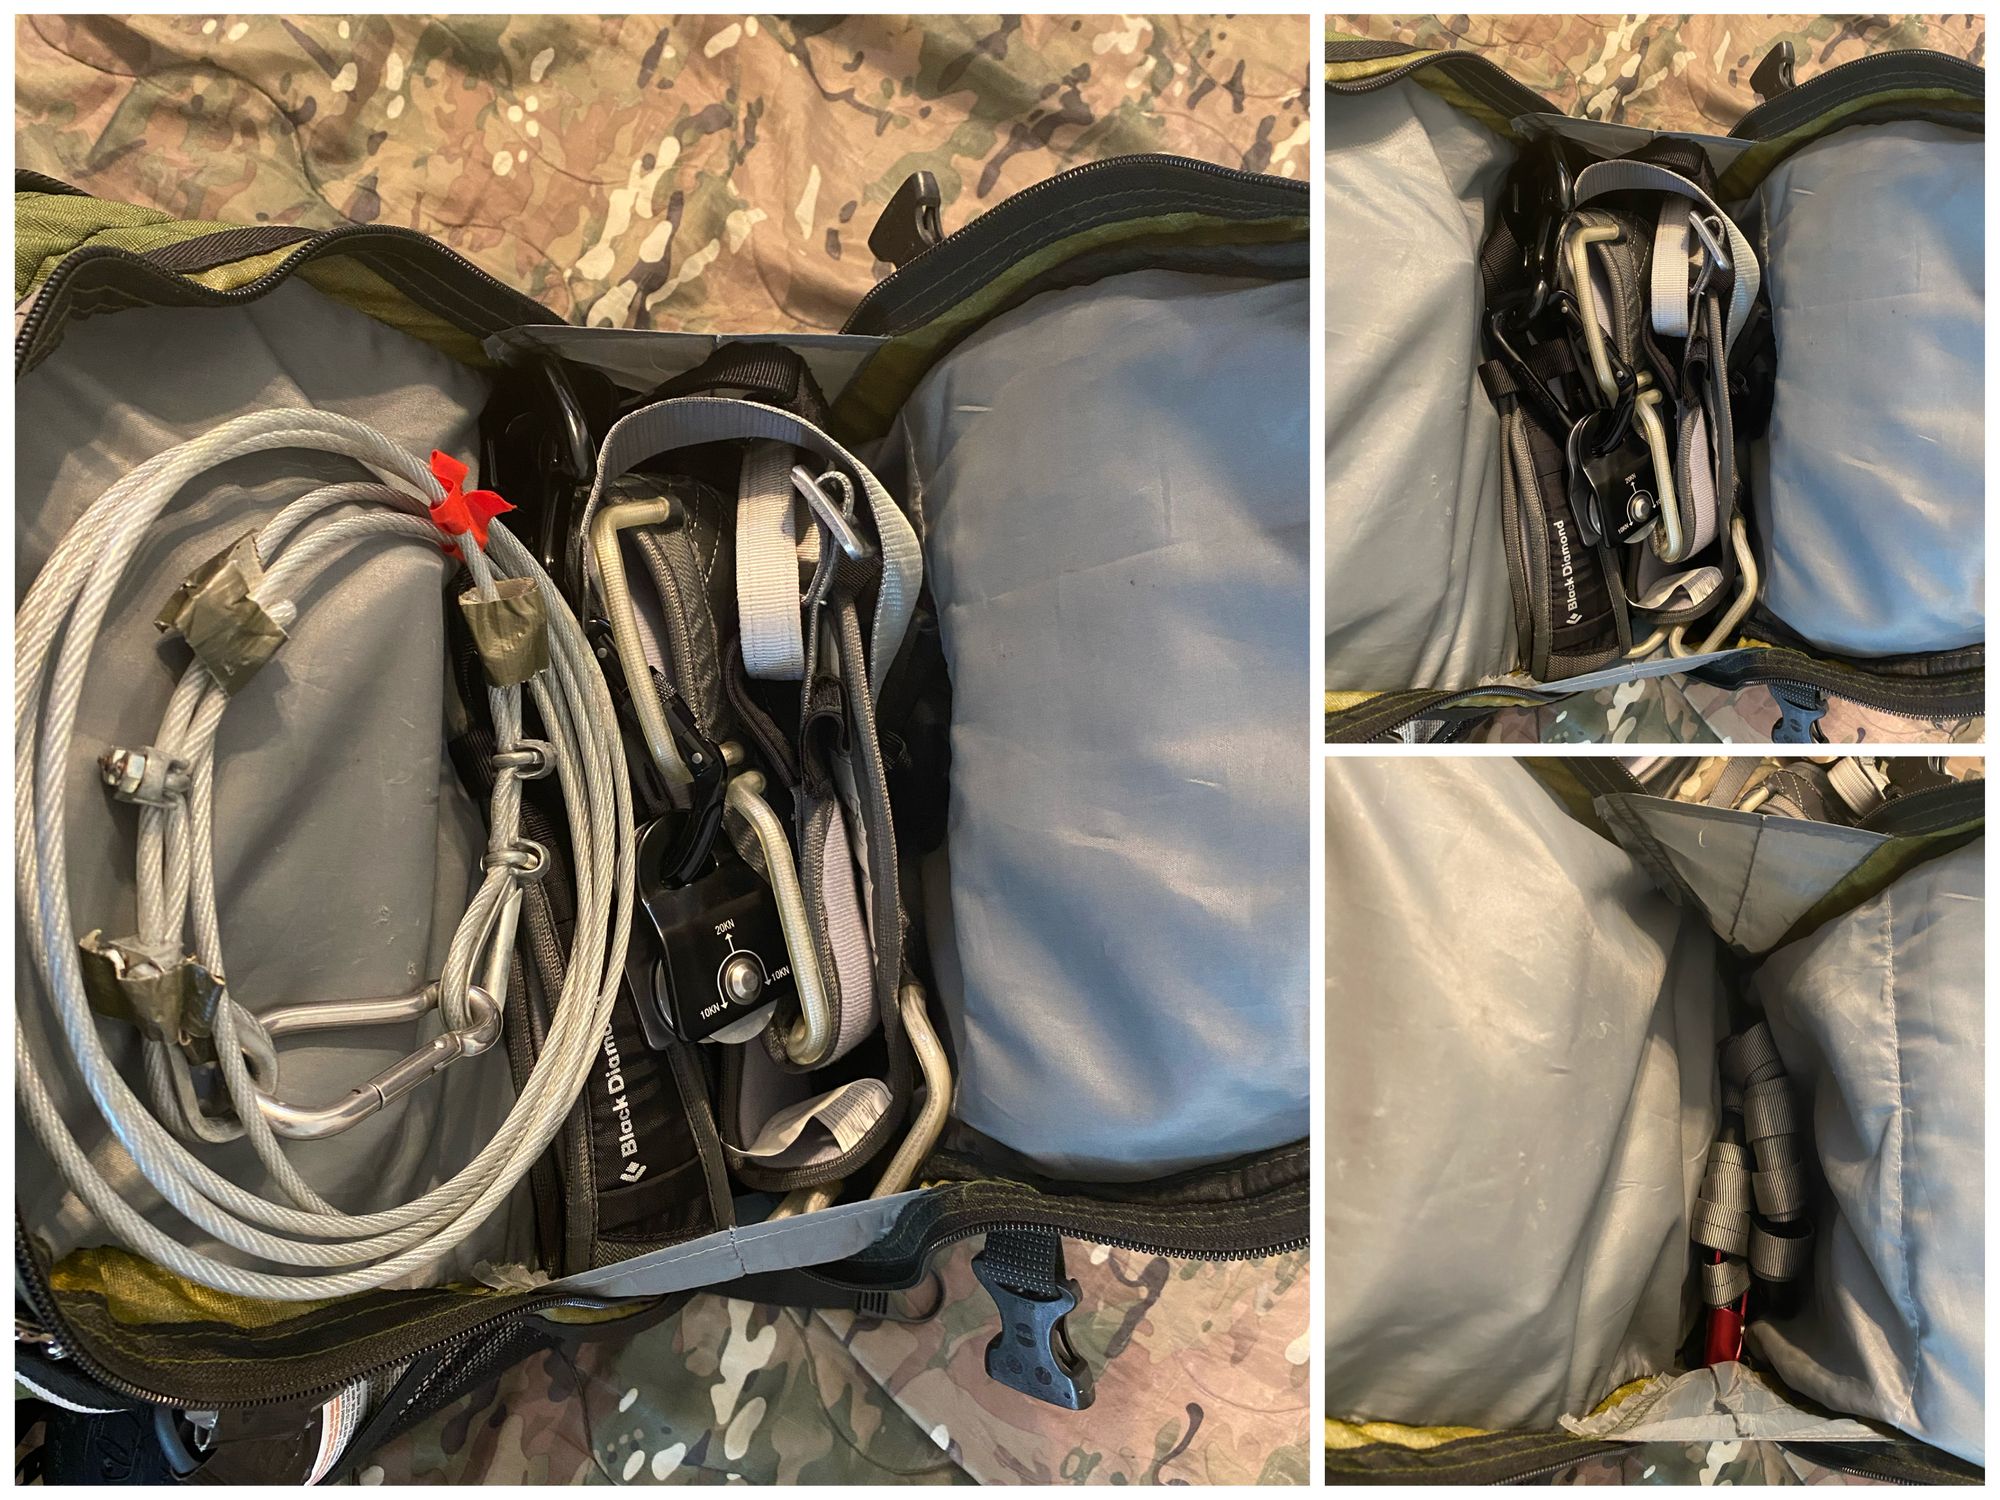
Again items are packed according to a first in last out principle. The ascenders will be needed only after the harness can be donned so it goes in first, followed by the harness. The "Rap Wrap" sits on top because it is seldom used and because it is easy to move out of the way if required.
So far the items listed are in the bag for the purpose of going up, down, or across the rope. I have never used these items on an engagement for fun, profit, or intended purposes. They exist only for very limited contingencies or imagined needs. They are not necessary or required, and should be thoroughly evaluated before purchase or packing to see if there is a legitimate need. Under no circumstances should a person purchase these items and assume they can use them safely. I encourage any reader to seek professional guidance (this post doesn't count).
The next solution is not well known, but is commonly called an under the door tool. This tool is better explained in a video created by the provider that I purchased mine from a few years ago. It works on a simple principle created by fire codes that require doors to always open from the inside, which is good if you wish to keep people from being burned alive, but bad for security.
This item is tough to pack well and as you can see in the image it remains in tension within the edge of the zippered compartment. Great care should be taken when removing it because it can sometimes spring out and hit you in the face or make a lot of noise (ask me how I know). This tool works in a surprising amount of spaces due to fire escape requirements for building and facility owners. I have used this item before and while it takes some practice to master, it rarely fails.
Another new item to add to this section were the Breachpens. As of this update they still haven't been tested, but offer a lot of promise. Consisting of a match and a stick of thermal material that can cut metal, they offer a compact package for quickly cutting metals. Obviously they do this by lighting the metal on fire though, so a lot of care should be practiced when using them. The video below is really the best way to be introduced. Also the dude's haircut is exceptional.
The slimmer medium sized compartment is loaded with my favorite tool for most of the applications I've found after the military. A hacksaw, patience, and time can get you in almost any place you want to go, but the uses can be tedious and if you performing this work as a service to a client it probably won't be allowed. The inflatable wedge and door stop have obvious uses, but most commonly used to make spaces in between the door and its frame or sweep so you can use other tools.
The remaining miscellaneous tools are kept in the small items compartment and will be described in the uppermost panel starting at the 12 o'clock position and moving clockwise. The first item is a simple door lock block. Watergate should have taught us all that placing simple tape over a strike plate is insufficient. This is a badge blank leftover from another project with a strip of tape setup for easy deployment. The idea is to place this in doors that have been made to open but might lock again behind or in front of you when left.
Continuing the next white plastic objects of varying shapes and sizes are shims to "credit card" door openings. These won't defeat deadbolts but you would be surprised how easy it is to gain entry using this technique. These were made from laundry detergent bottles which I have found to be the best for this task. They are soft enough to slide around the latch bolt and stiff enough to impinge upon it. There are a lot resources online that do a better job of describing how this works and they should be consulted with more than a few hours of practice devoted to getting it correct.
The collapsible baton shown is not required for this bag, and is only carried here for contingencies that won't be mentioned other than a need to possibly have an object to pry with if needed. Fat Max Fubar hammers are much better suited for this task, and people should look into them and possible modifications. The keyring holds bump keys for the most common locks in use with residential locks. There is also a small led light on the keyring because some of this work might require it. Bump keys get their name from the way they are used, which involves bumping them to drive the lock pins up past the sear while turning the cylinder. This is are very difficult method to master and can break lock pins if you aren't careful. Be sure to practice on locks you can afford to lose and practice a lot. It is not easy.
Most people know the next item shown in the leather pouch. These particular lock picks are cheap and not that great for regular or hard use. If you plan to use them often or have higher stakes picking in mind pay for better solutions. Don't go cheap like I have done. I don't particularly like lock picking and don't prefer them so I haven't invested much money.
The roll of tape is a simple roll of tape. You never know when you need to use tape but you often will need to use some tape, so carry a flattened amount in any bag you create, chest rig you wear, or car you drive. You'll need it. I'll skip the highlighter for now and go directly to the mirror.

This mirror is on a telescoping handle like an old school car antenna. It is mounted on a ball joint so that you can rotate and adjust it in any direction. This can be used to make adjustments to solutions like the under the door tool. It can also be used to look at areas before crossing their thresholds, like corners or doorways.
The battery powered chemlight is another good tool to have. This one is made by LazerBrite and has a few features. The bulb for the white light allows for low to medium lighting of a room while the tubular light has a diopter to open and close with a few low to medium red light settings. The use for this is for areas that are more public where you wouldn't want to raise visibility and only need to cast a dim light on a particular surface.
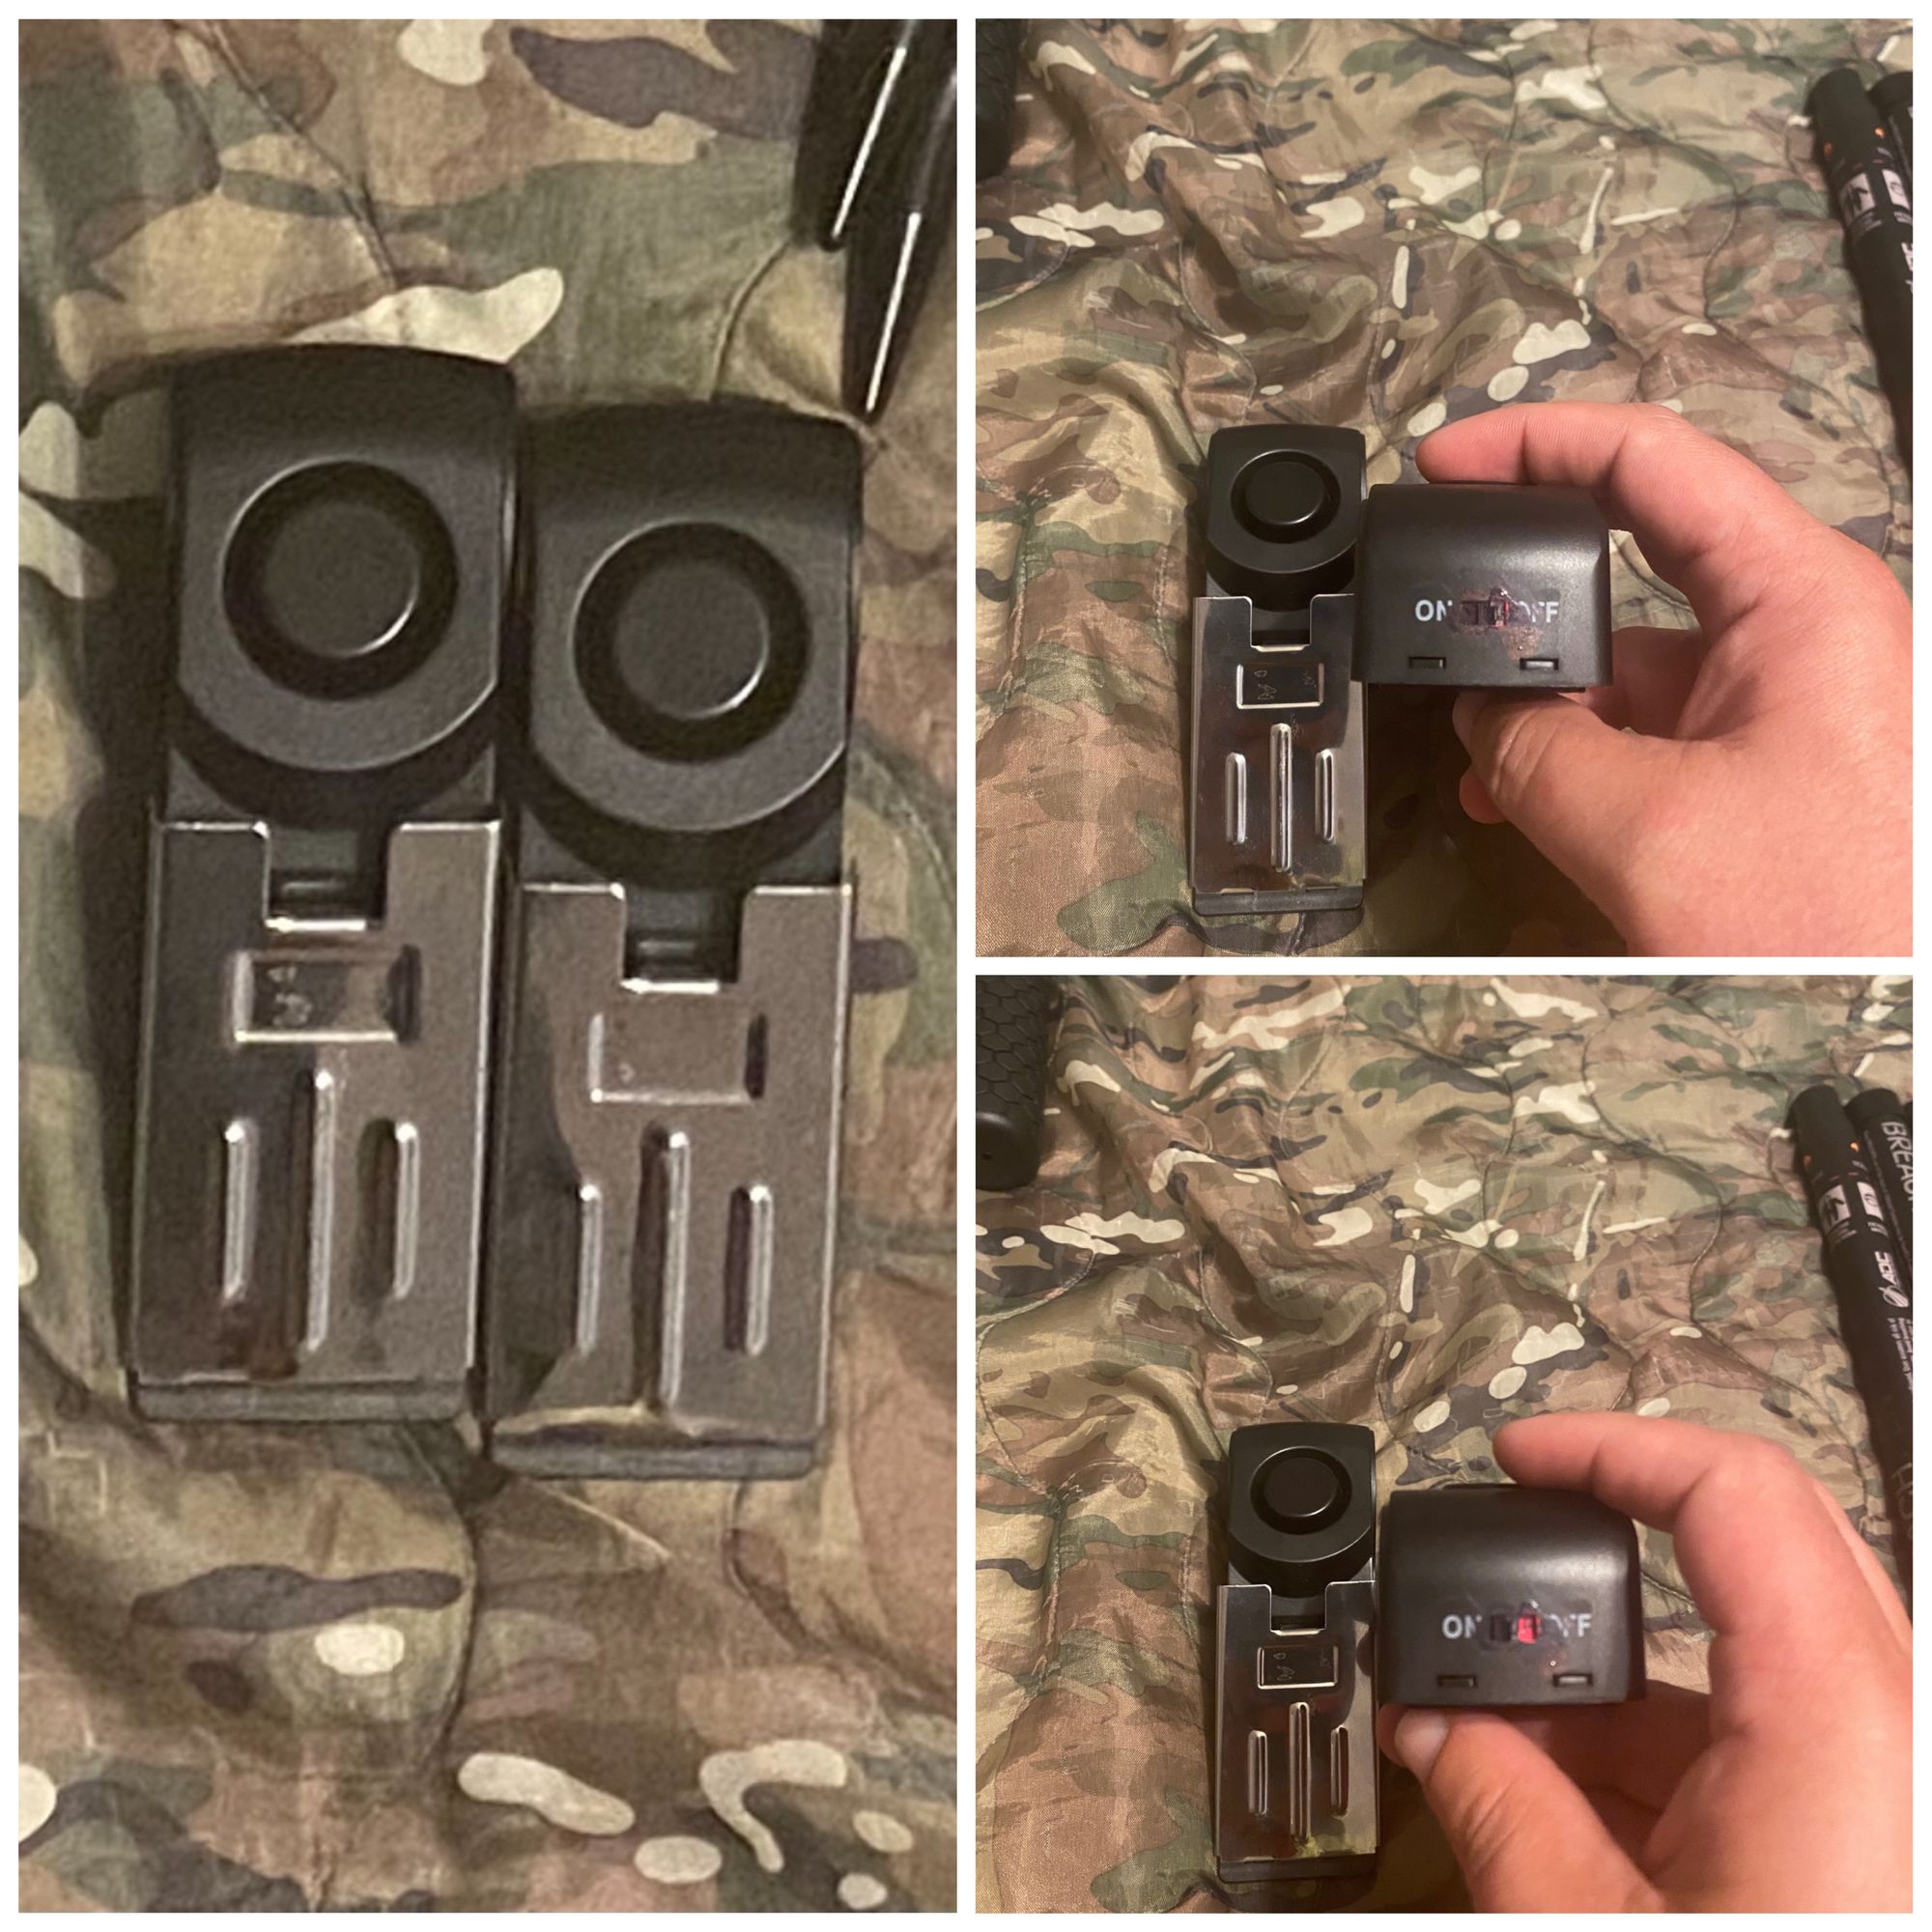
The door stop alarms are to be tested but have been included to provide some early warning in ad hoc situations. The switches have been cut off to avoid accidental deployment. In order to ensure that the on/off labeling doesn't wear off and cause confusion, they have been painted to indicate the "on" position.
The last two items seem very strange additions and I'm not sure how common their use in onsite penetration testing but I have worked on developing a technique with their use for a few years. In the industry I tested there was a lot of use of cypher and keypad locks. Often you can just stick around and see someone use the lock, or maybe use a camera to attempt to record someone typing in the code. But to me the best way to capture these codes without getting caught is to paint the numbers with the highlighter. Most of the people that are going to touch the lock are going to input the correct numbers and when they do they will smudge the highlighter ink. You should be able to discern this by where the highlighter ink has been smudged with the powerful UV flashlight.
Most of these locks are a combination of four digits. I've found that the combinations are usually obvious once found. Building or unit numbers, dates, or telephonic translations. Experimenting with this knowledge I created a script that helps make this effort potentially easier, which began as a simple brute force generator. According to math nerds there are only so many permutations of a given set of numbers with a limit of digits. So with this principle in mind a four digit combination has only twenty four permutations if you know which numbers are the numbers used to open the door and no number is repeated. With this knowledge you can run all the possible codes and eventually open the door, but it might help to start with the most likely.
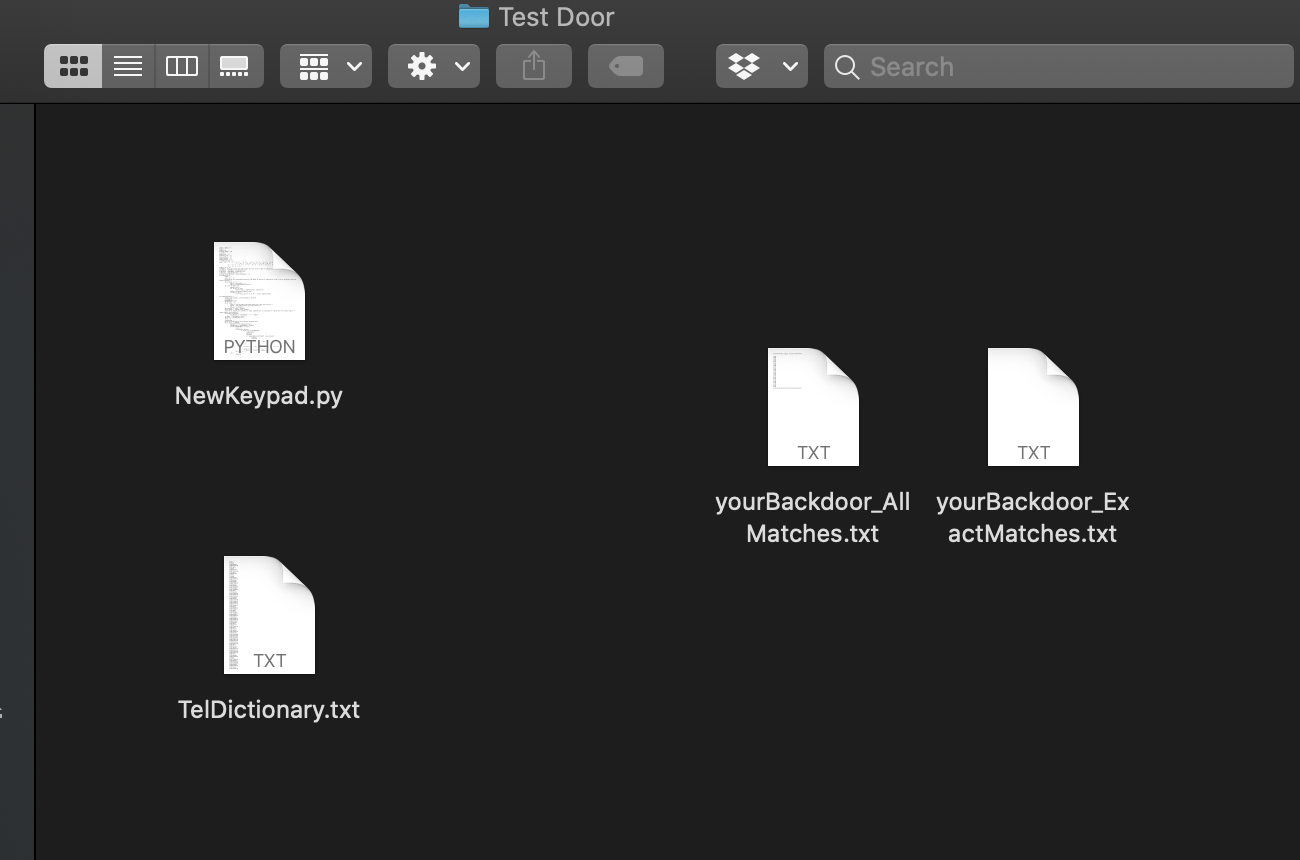
That's where this script comes in handy. It is really simple and I'm sure if you found some legit coder they would laugh at how poorly written it is, but it works. You take the .py (python script) and the .txt file and place it in a directory on your desktop or where ever you want and run it from that directory in the command line. If you have no idea what I'm talking about, again there are other resources that can teach this and you should be familiar.
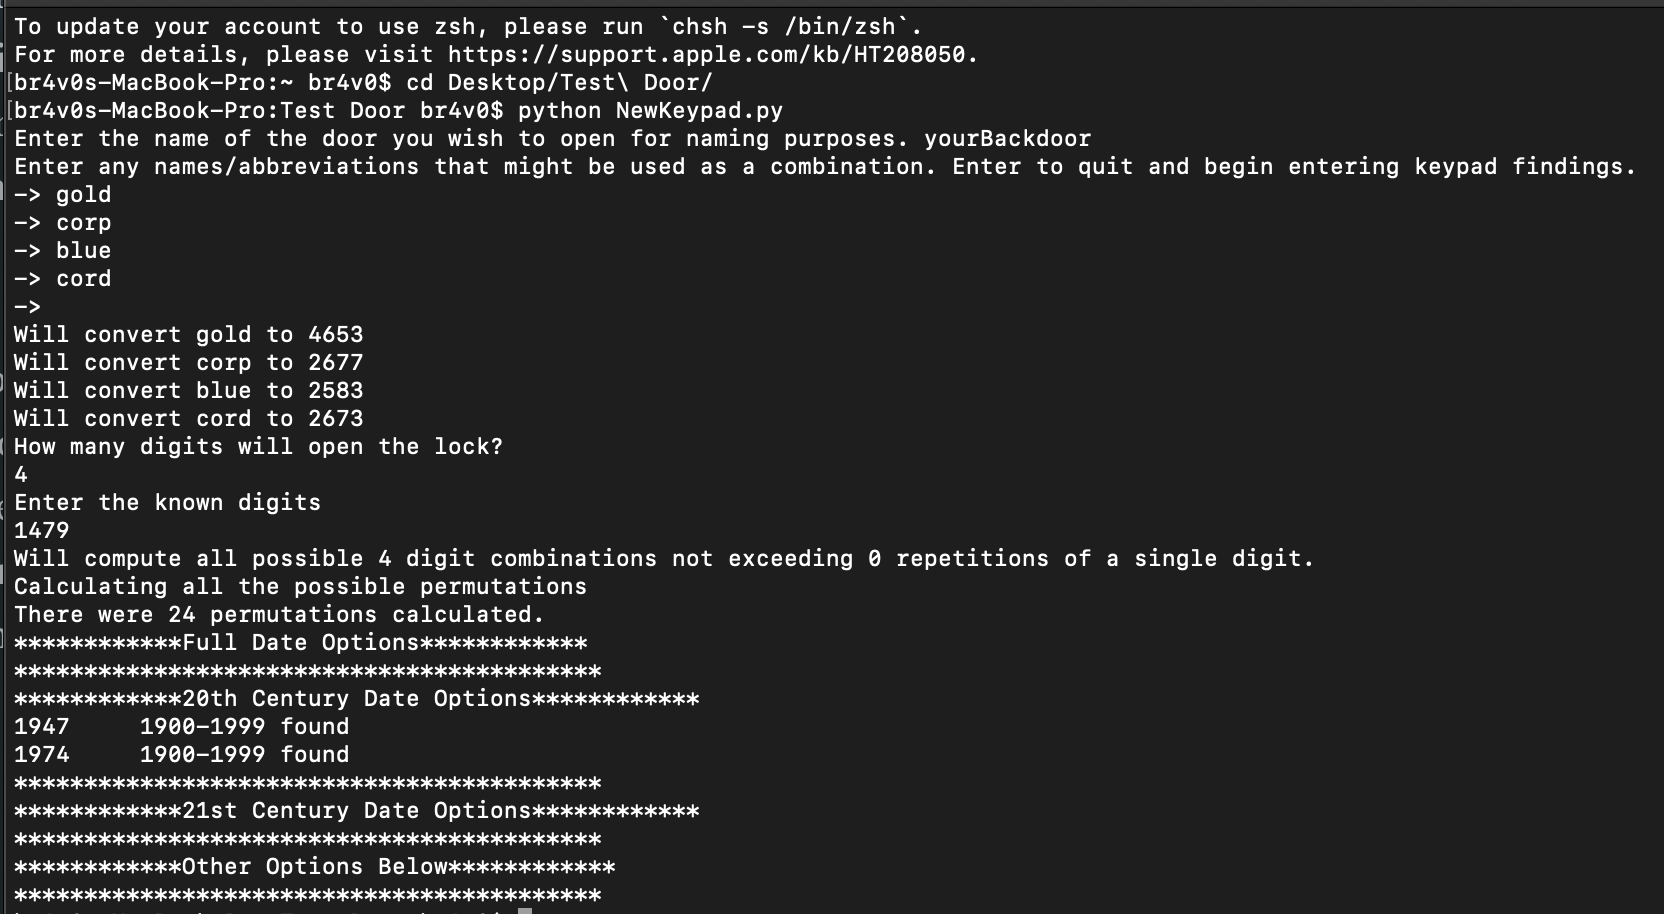
This sample should show some basics of how it should function. You take the command line into the directory where your script and telephonic dictionary are present. Run the script. It will ask some questions about fingerprinting, which is simply just things you guess might be the code. After entering these you should press "return" or "enter." It will do the conversion and add these to the search it will do later. It then will ask the number of digits for the lock. Next the known digits. After these are done the script does all the work. It will look for dictionary words and dates. Besides the output given at the terminal you will be given two files in your directory.
In this case there where no exact matches, so the only valuable information is found in the AllMatches.txt file where you can see every possible permutation. The terminal gave a few date suggestions so I would start with those probably and if they didn't work I would begin to work my way down the list. Obviously this would take some time and might attract attention.
Another run of the script looking for a four digit code with only three known numbers {4,5,6} (because repetition is possible and is found really often) nets us better results.
5646=john
5646=join
5646=logo
5646=loin
4655=holk
6455=milk
6455=mill
6455=nill
5464=king
5464=ling
That sample should show you the intent behind the concept. It's not perfect and the code should be revisited by someone with more imagination, but it has borne fruit in the wild during testing.
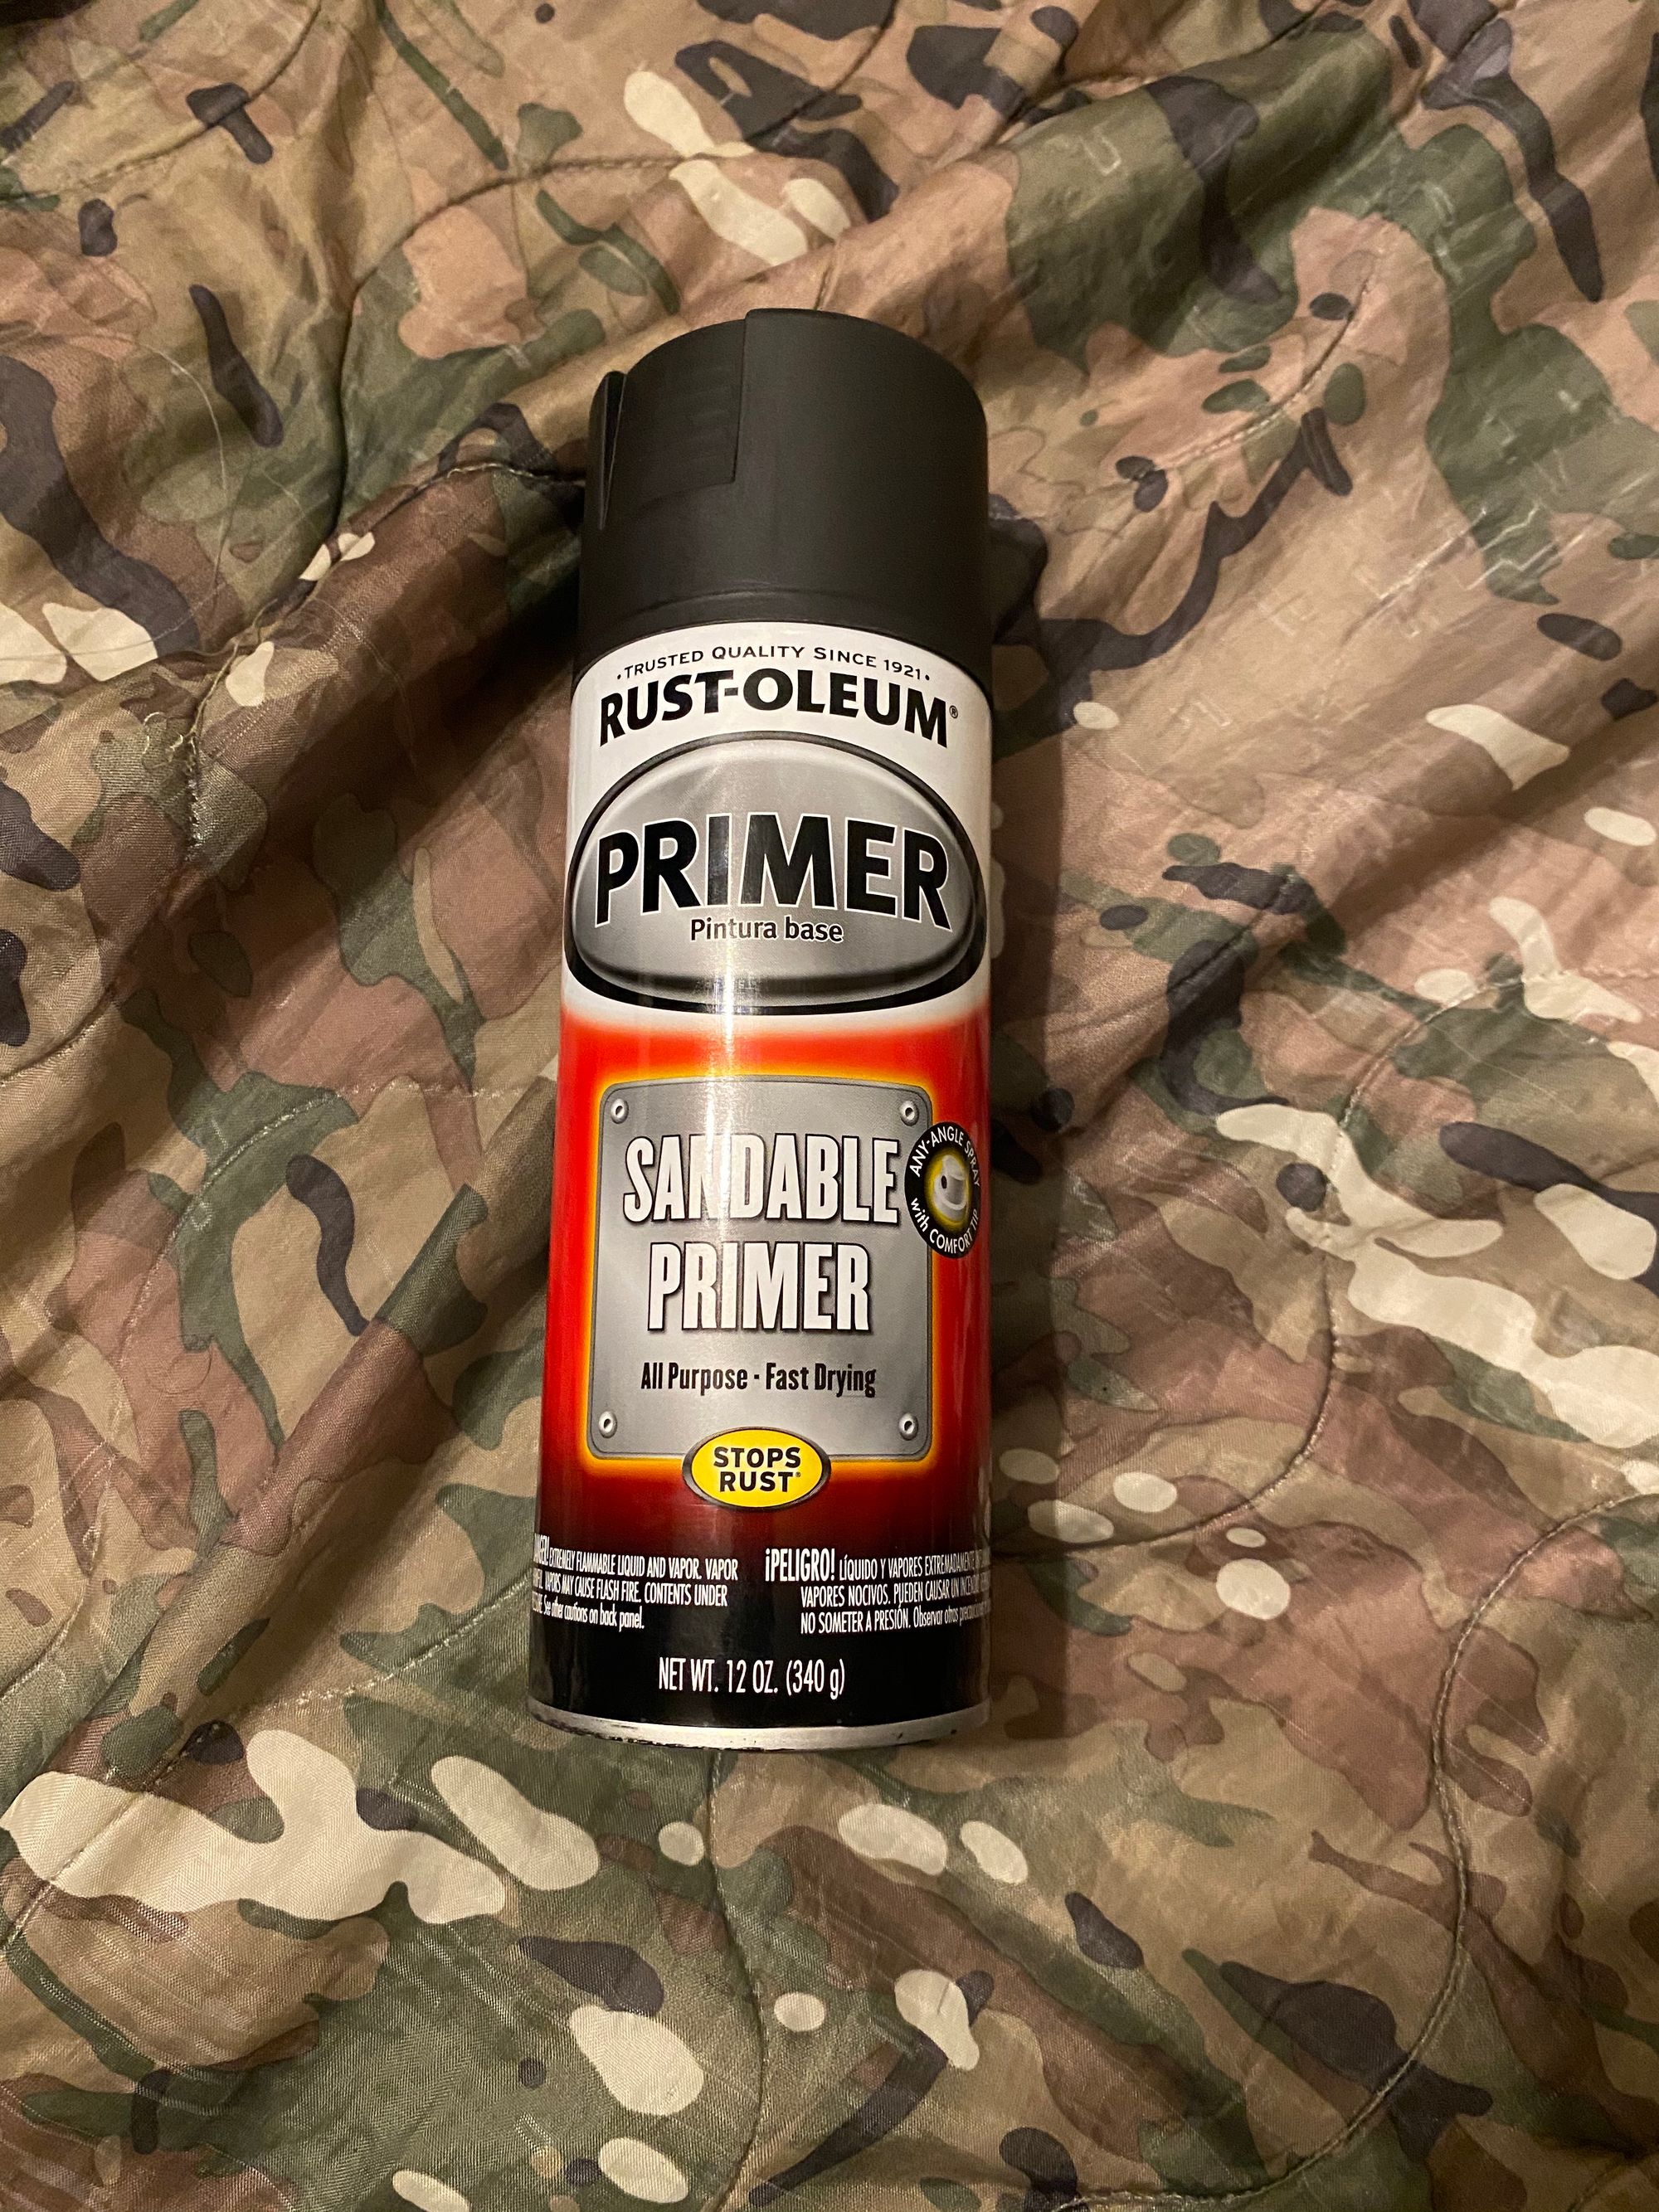
This last item is kept on the outside of the bag, but could be carried inside if it might cause suspicion. Spray paint like this is great at obscuring windows, cameras, mirrors, or other items that might make your imagined or totally legal activities too noticeable or obvious. This particular brand in light coatings can dry and block the vision of many surfaces or systems quickly.
After all of this has been said I'll admit that this bag has been around for nearly a decade and has been rarely used. It was created out of possible need that never met much in reality. In truth I never needed it to get into most of the places I was testing. My technical speciality wasn't really technical at all, and these kit bags were just a thing I had back at the hotel room or in a rental car trunk.
I'll save those tactics for another post but they related much more to what has now been rebranded as "social engineering" which is just a fancy term for what most of you already know how to do, which is mislead or misrepresent someone with false but believable information. Most often with the right costume, story, and prop equipment I could get what I needed from a target, and instead of using all these tools the people I was testing would open the door for me. But that's a whole other long post and it's getting late.